NOTE: The sale is over, thanks to all who supported us through this event!
Another year mostly on the books! The support from our customers has been overwhelming and I sincerely appreciate it! It is truly staggering to realize just how big this has become! Here are some interesting stats:
Product sales (on the website only) between Jan 1, 2023 and Oct 30, 2023:
Not bad for a business created to support a study website! Thank you so much for all of your support!
New in 2023
First, the bad: This year we have temporarily discontinued the half wave signal stalk, pending some additional testing to explain some issues that we have been unable to reproduce. I have hopes to bring them back next year but I need to make sure we’re able to support them.
Next, the good! We have introduced two new exclusive adapter types — the BNC-M to SMA-M and the BNC-M to SMA-F. These adapters are perfect to put on your BNC Magmount if you need to use the stock antenna from your radio — or just another antenna that isn’t available in BNC. While you can of course get adapters to make that change elsewhere, I think you’ll agree that ours are quite a bit more streamlined and nicer than is typical — in fact I had these custom made for us and I haven’t seen the like elsewhere.
Additionally we’re still making incremental improvements to the BNC magmount — I have maybe 200 left of our current stock and then the next batch will have a thicker rubber cover which should be significantly less likely to tear. We’ll also make that cover available by itself when we have it. I can’t start including them until we have them, though, so most of the ones sold during this sale I’m afraid will still have the old ones. Granted, those are still pretty good, we just want to make them better =]
Finally, I’d like to officially welcome Jessica and David to my team this year — Jessica is handling order fulfillment and first line support and David has taken over nearly all manufacturing so that I can spend more time working on HamStudy and ExamTools. Thanks folks!
The 2023 sale
Without further yapping or wasting of time, here is the sale!
When:
The 2023 sale will begin Friday, Nov 24 and run through Tuesday Nov 28. That’s one day longer than usual, just because I felt like it while writing this post ;-)
What:
This may look familiar — it’ll look pretty much the same as last year. I could change it, but that would require more work than I’m currently willing to put into it =]
I’m trying something new this year and announcing the sale ahead of time — remember this won’t be active until Friday Nov 24, 2023! Also, I expect we’ll end up with some backorders — we should be able to get any of those shipped within two weeks at the most.
Due to circumstances beyond our control we missed doing our traditional Black Friday sale, so we’re doing one a week late! The sale will begin on Friday, Dec 2, 2022 and will continue through the end of Tuesday, Dec 6, 2022. If we run out of stock on anything I’ll make more and get them shipped within a week.
There are two other changes of note that I’ve rolled out with this. The first is that for 440 and 220 antennas I am no longer going to keep all the colors in stock — I just don’t sell enough to make it worthwhile and it takes far more time and energy than is worthwhile. Instead I am now only keeping Black and Glow in the Dark. Orders of 50 or more can request a different color heat shrink if they want =]
The second change is that I have added a “factory second” product type at a significant discount — these are products which are completely usable but have some type of defect. Some of them are really really minor — everything left that still had 3d printed parts are in there now, for example, as well as other minor issues where I am *almost* comfortable selling it anyway. Others are a bit more significant, like a cracked or broken piece of plastic which nonetheless has no effect on performance.
The price is significantly reduced, but the warranty is also decreased and you don’t get to choose your color — it’s just a “give me something usable for cheap” type of deal and I hope you find it useful!
The longer story
Early sample of the SMA-F injection molded plastic cover — Picture taken Dec 22, 2021
For the last couple of years I’ve been slowly investigating getting our plastic parts injection molded; while I love being able to make all the parts myself and make rapid changes, there are also some downsides. For one, 3d printing large batches of items makes it very easy for little problems or inconsistencies to be missed! Another that hit us a number of times though is that it isn’t as strong and so we had a lot of SMA-F connectors where the cover was damaged during shipping. Also printing the tips was a *pain* — so much could go wrong and they were so small that it required changing print jobs every 6-8 hours for days on end and the result was far from truly professional.
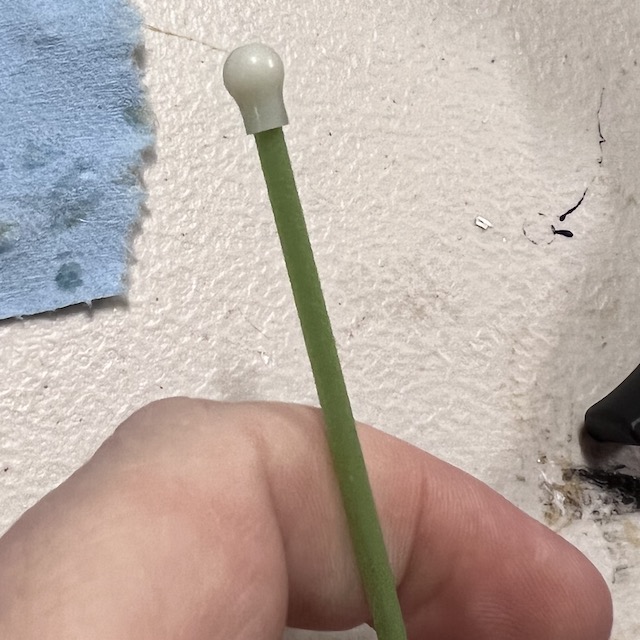
First usable sample of the “lightbulb tip”. Jan 17, 2022
Non-glow in the dark sample from the first iteration of the mold — it didn’t fit right but was close enough to make a usable prototype. April 1, 2022
At any rate, in May 2022 just barely in time to get new parts ready for Dayton Hamvention we got our first (barely) usable shipment of black plastic parts for SMA-F. We had already changed to using injection molded tips sometime earlier in the year (I can’t find a picture to tell me for sure when, but probably March or April sometime). The trouble with the parts we got in May was that they were too tight – and they made a mistake and didn’t send me any glow in the dark parts. I had to build some special push tools so that I could get them on — but they were fortunately barely usable. At this point we realized that the injection mold company needed to have samples of the metal parts to test them on, giving precise dimensions just wasn’t going to cut it.
Injection molded black caps for the SMA-F connectors, first fully usable samples. April 7, 0222
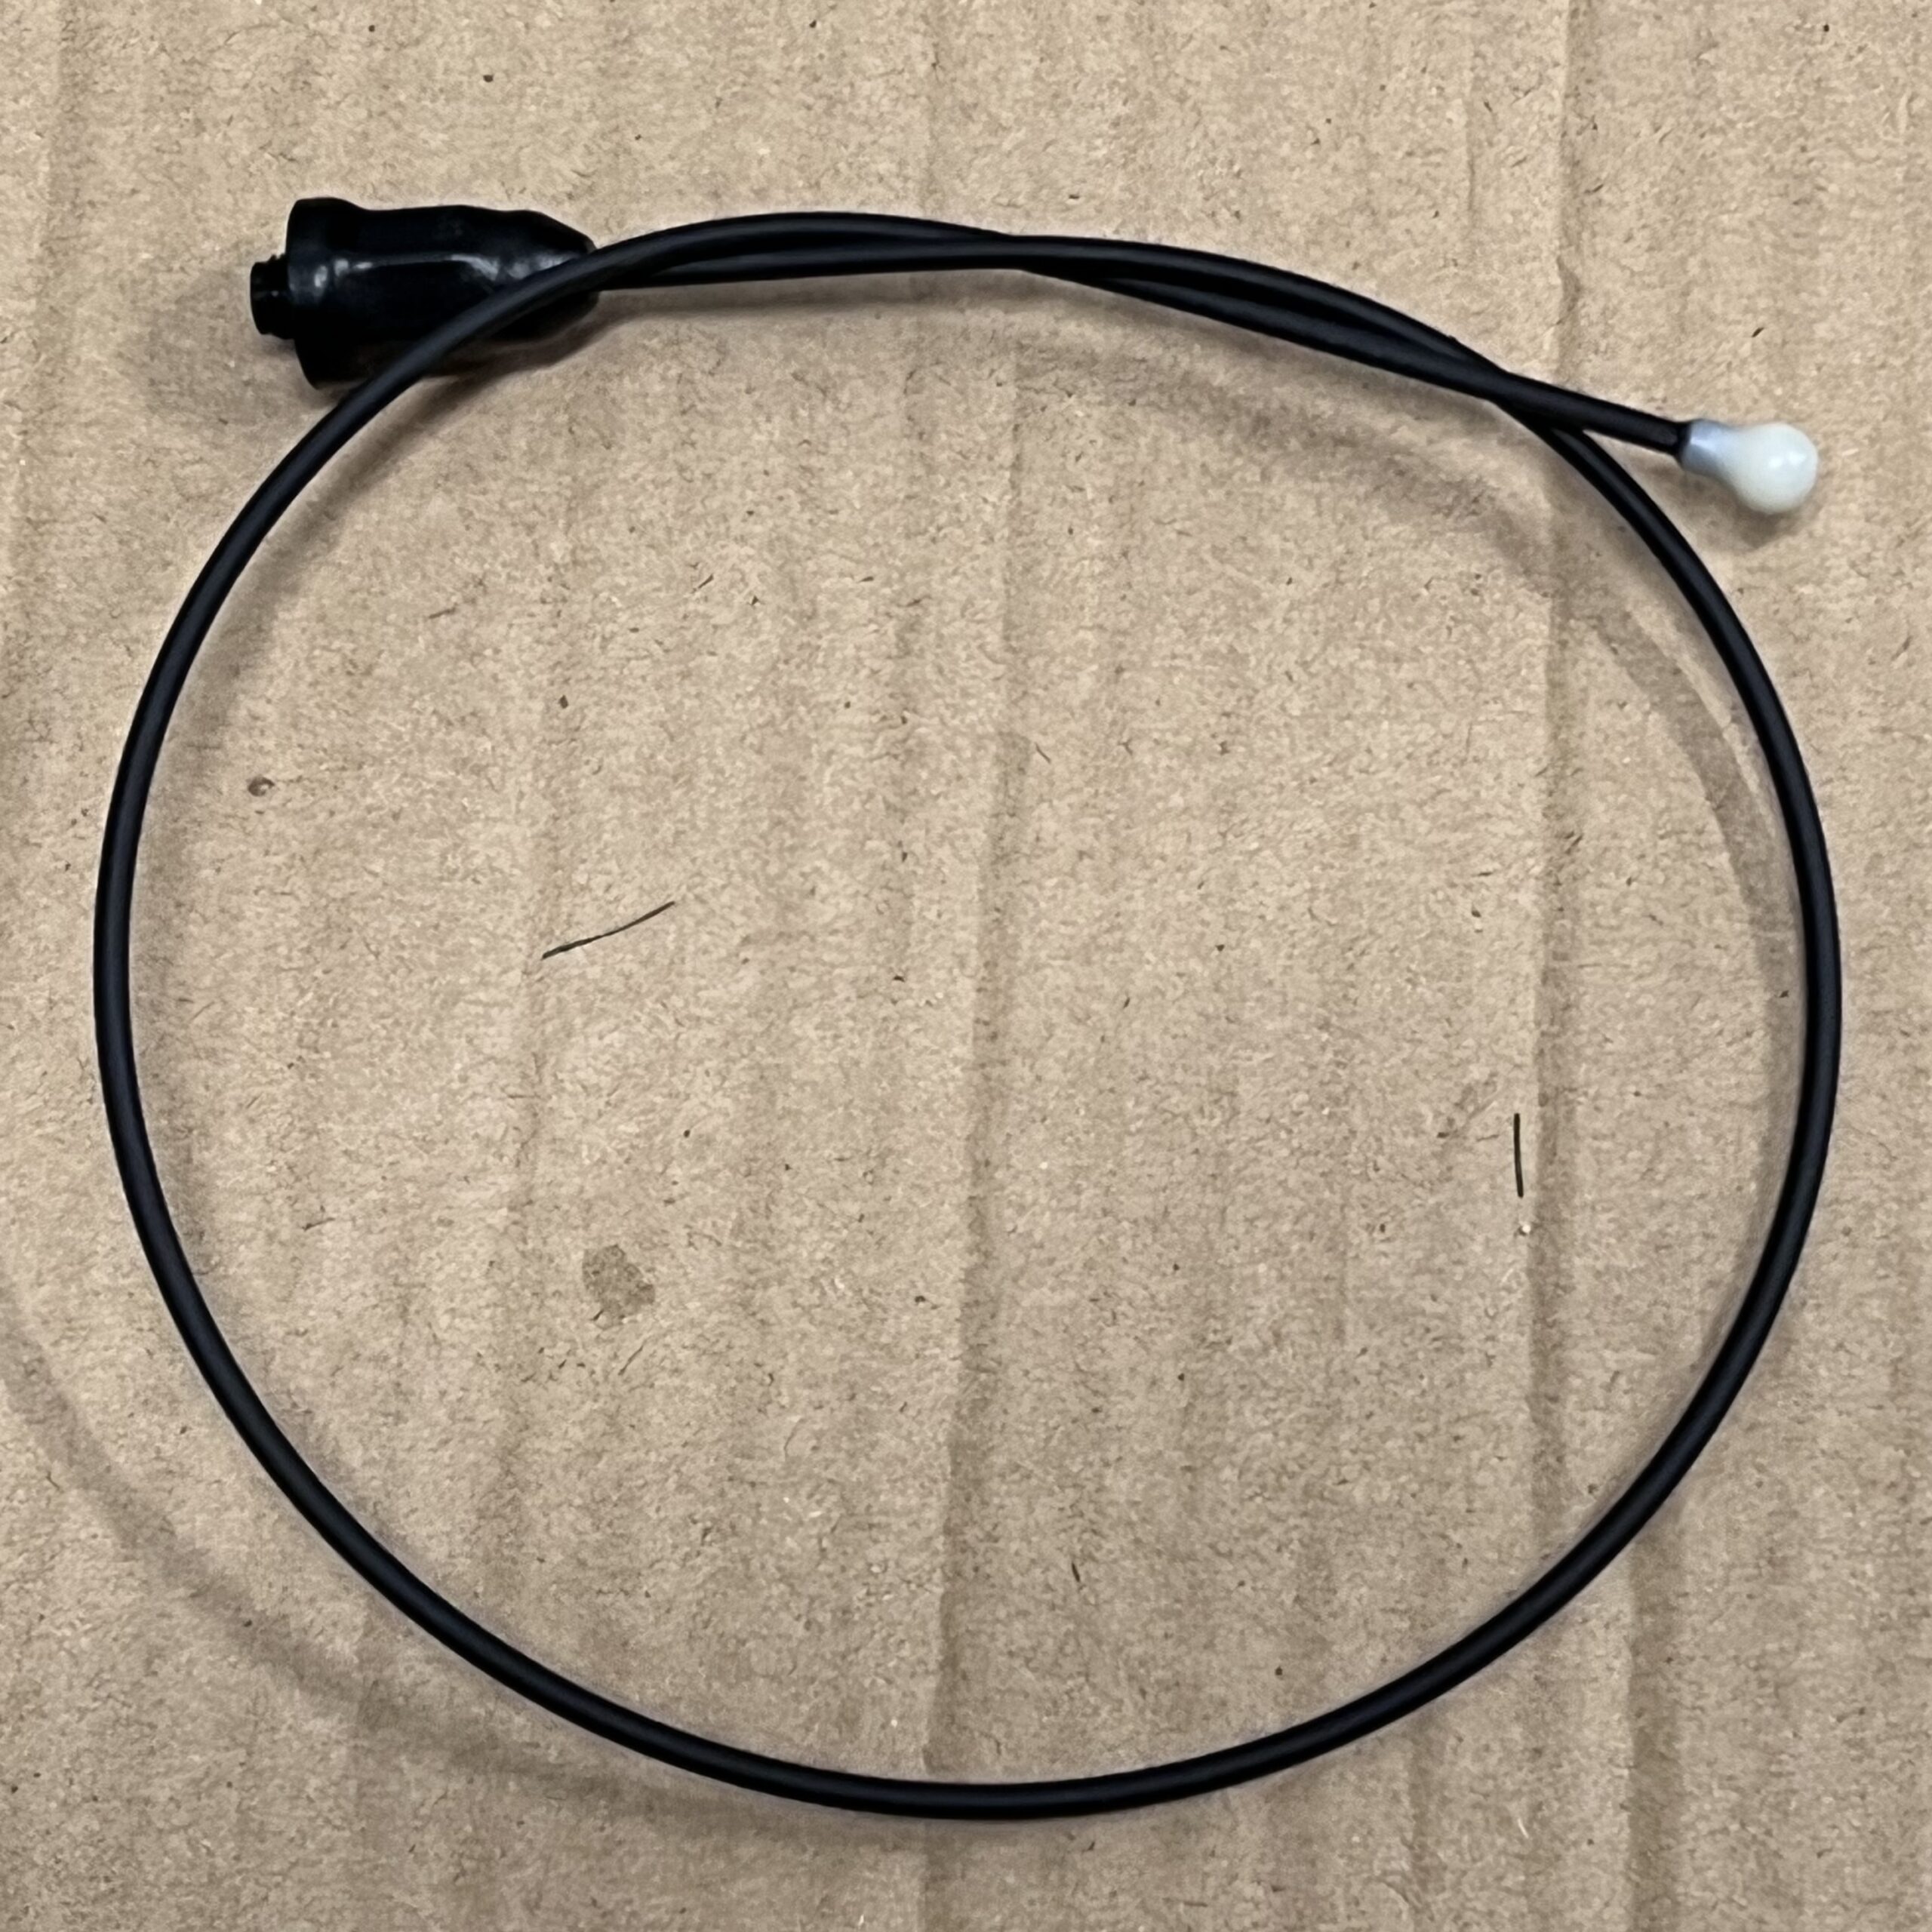
One of the first SMA-F antennas made with the new injection molded parts. May 13, 2022.
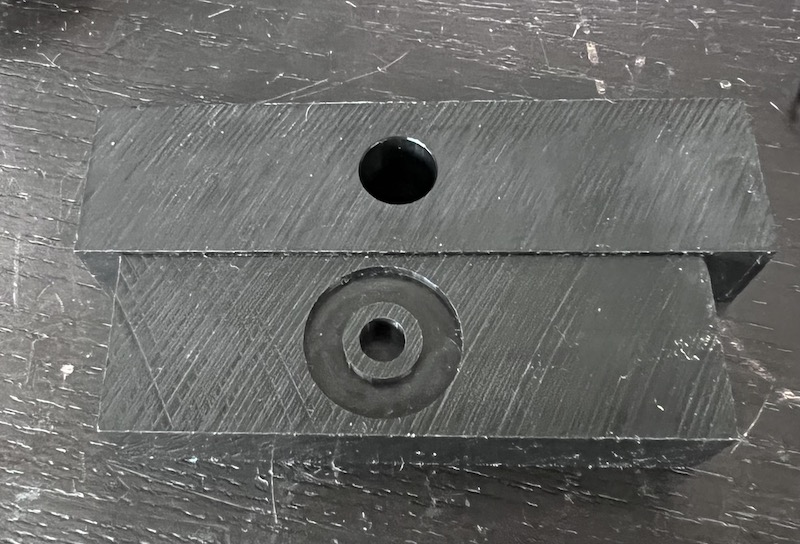
I used my Bantam Tools Desktop CNC mill to make this out of Delrin plastic; the top piece holds the plastic cap, the SMA threads slide into the bottom, and you can use it to push the part in. That is the only was I was able to install the parts for several months.
Getting the size issue fixed took a lot longer than it should have and the person I was working with at the injection molding company in China no longer works there. Long story short, though, I finally got both properly-fitting parts and the glow in the dark parts towards the end of August. At that point I finally started working on the molds for BNC and for SMA-M.
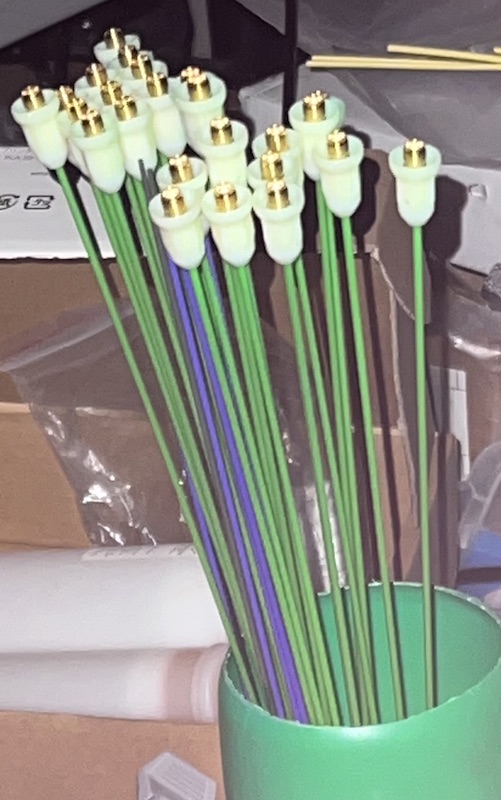
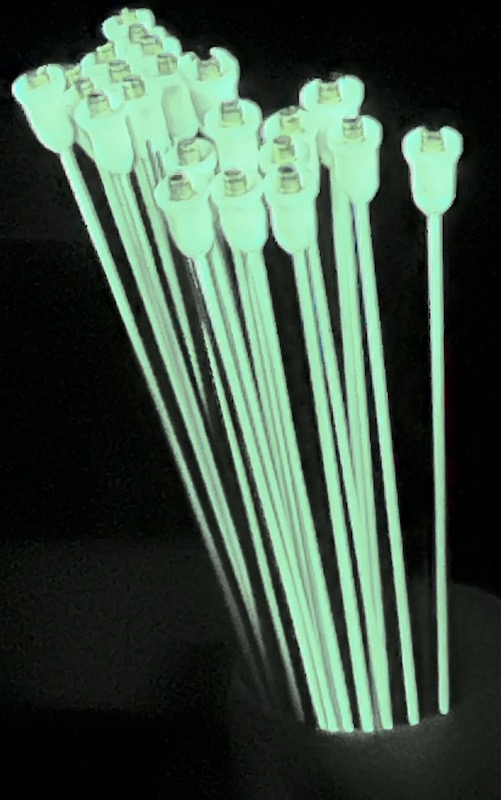
First build with the new injection molded Glow in the Dark caps… which did in fact glow!
The problem
So all of this was very cool and I have been super excited about it — but the challenge is that when you make a change like this as soon as you have new parts that look *way* better than the old ones you feel like you can’t sell the old ones! For most of October and basically all of November I didn’t want to make any more antennas than I had to with BNC or SMA-M because I knew those new parts should be coming out any day — and I didn’t want to get them and have a huge number of “inferior” antennas that I still needed to sell.
Then just as they were finally done and had been sent to the forwarding facility — the city the forwarder was in went into a 7 day COVID lockdown. I had already stopped making those and I decided that instead of continuing to make and sell antennas that weren’t as good I would hold off. That lasted until Nov 29 (past Black Friday) when I finally received the parts. By that point you could accurately describe the state of my shipping shelf as … bare.
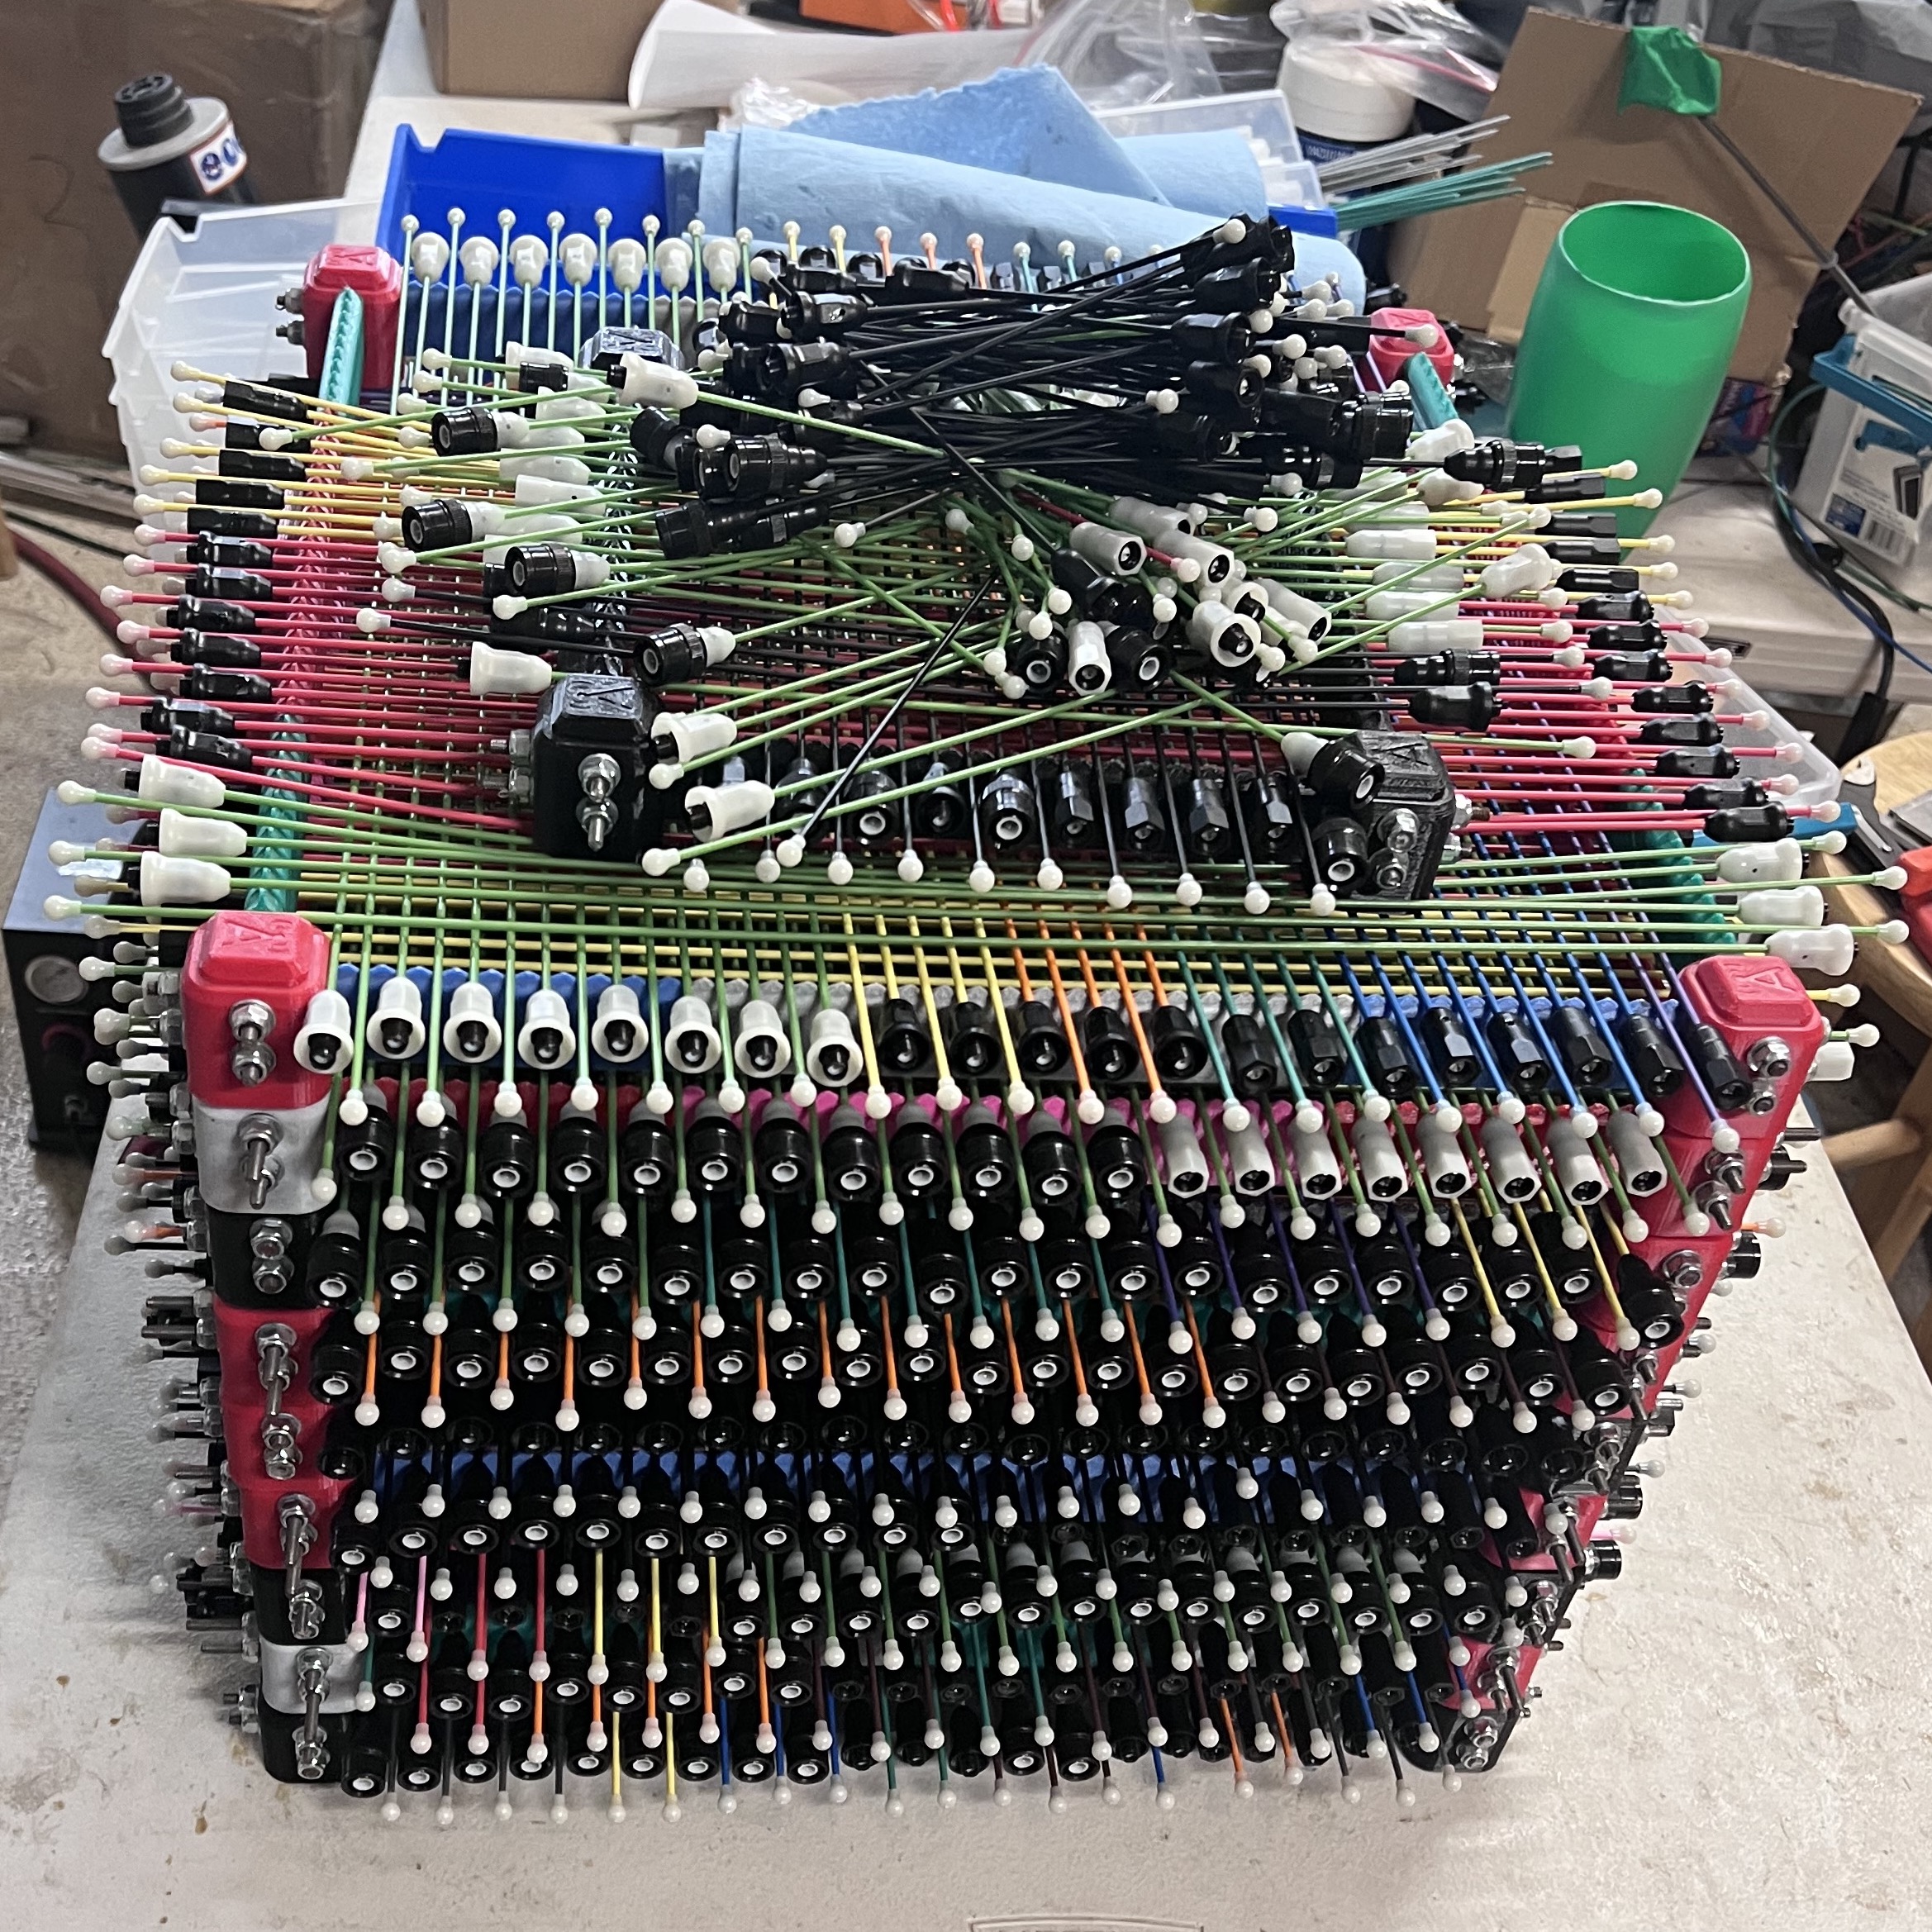
This was taken Nov 28; even most of these antennas were gone this morning (Dec 1) when I finally had some new antennas to put in the bins.
Building as fast as I can
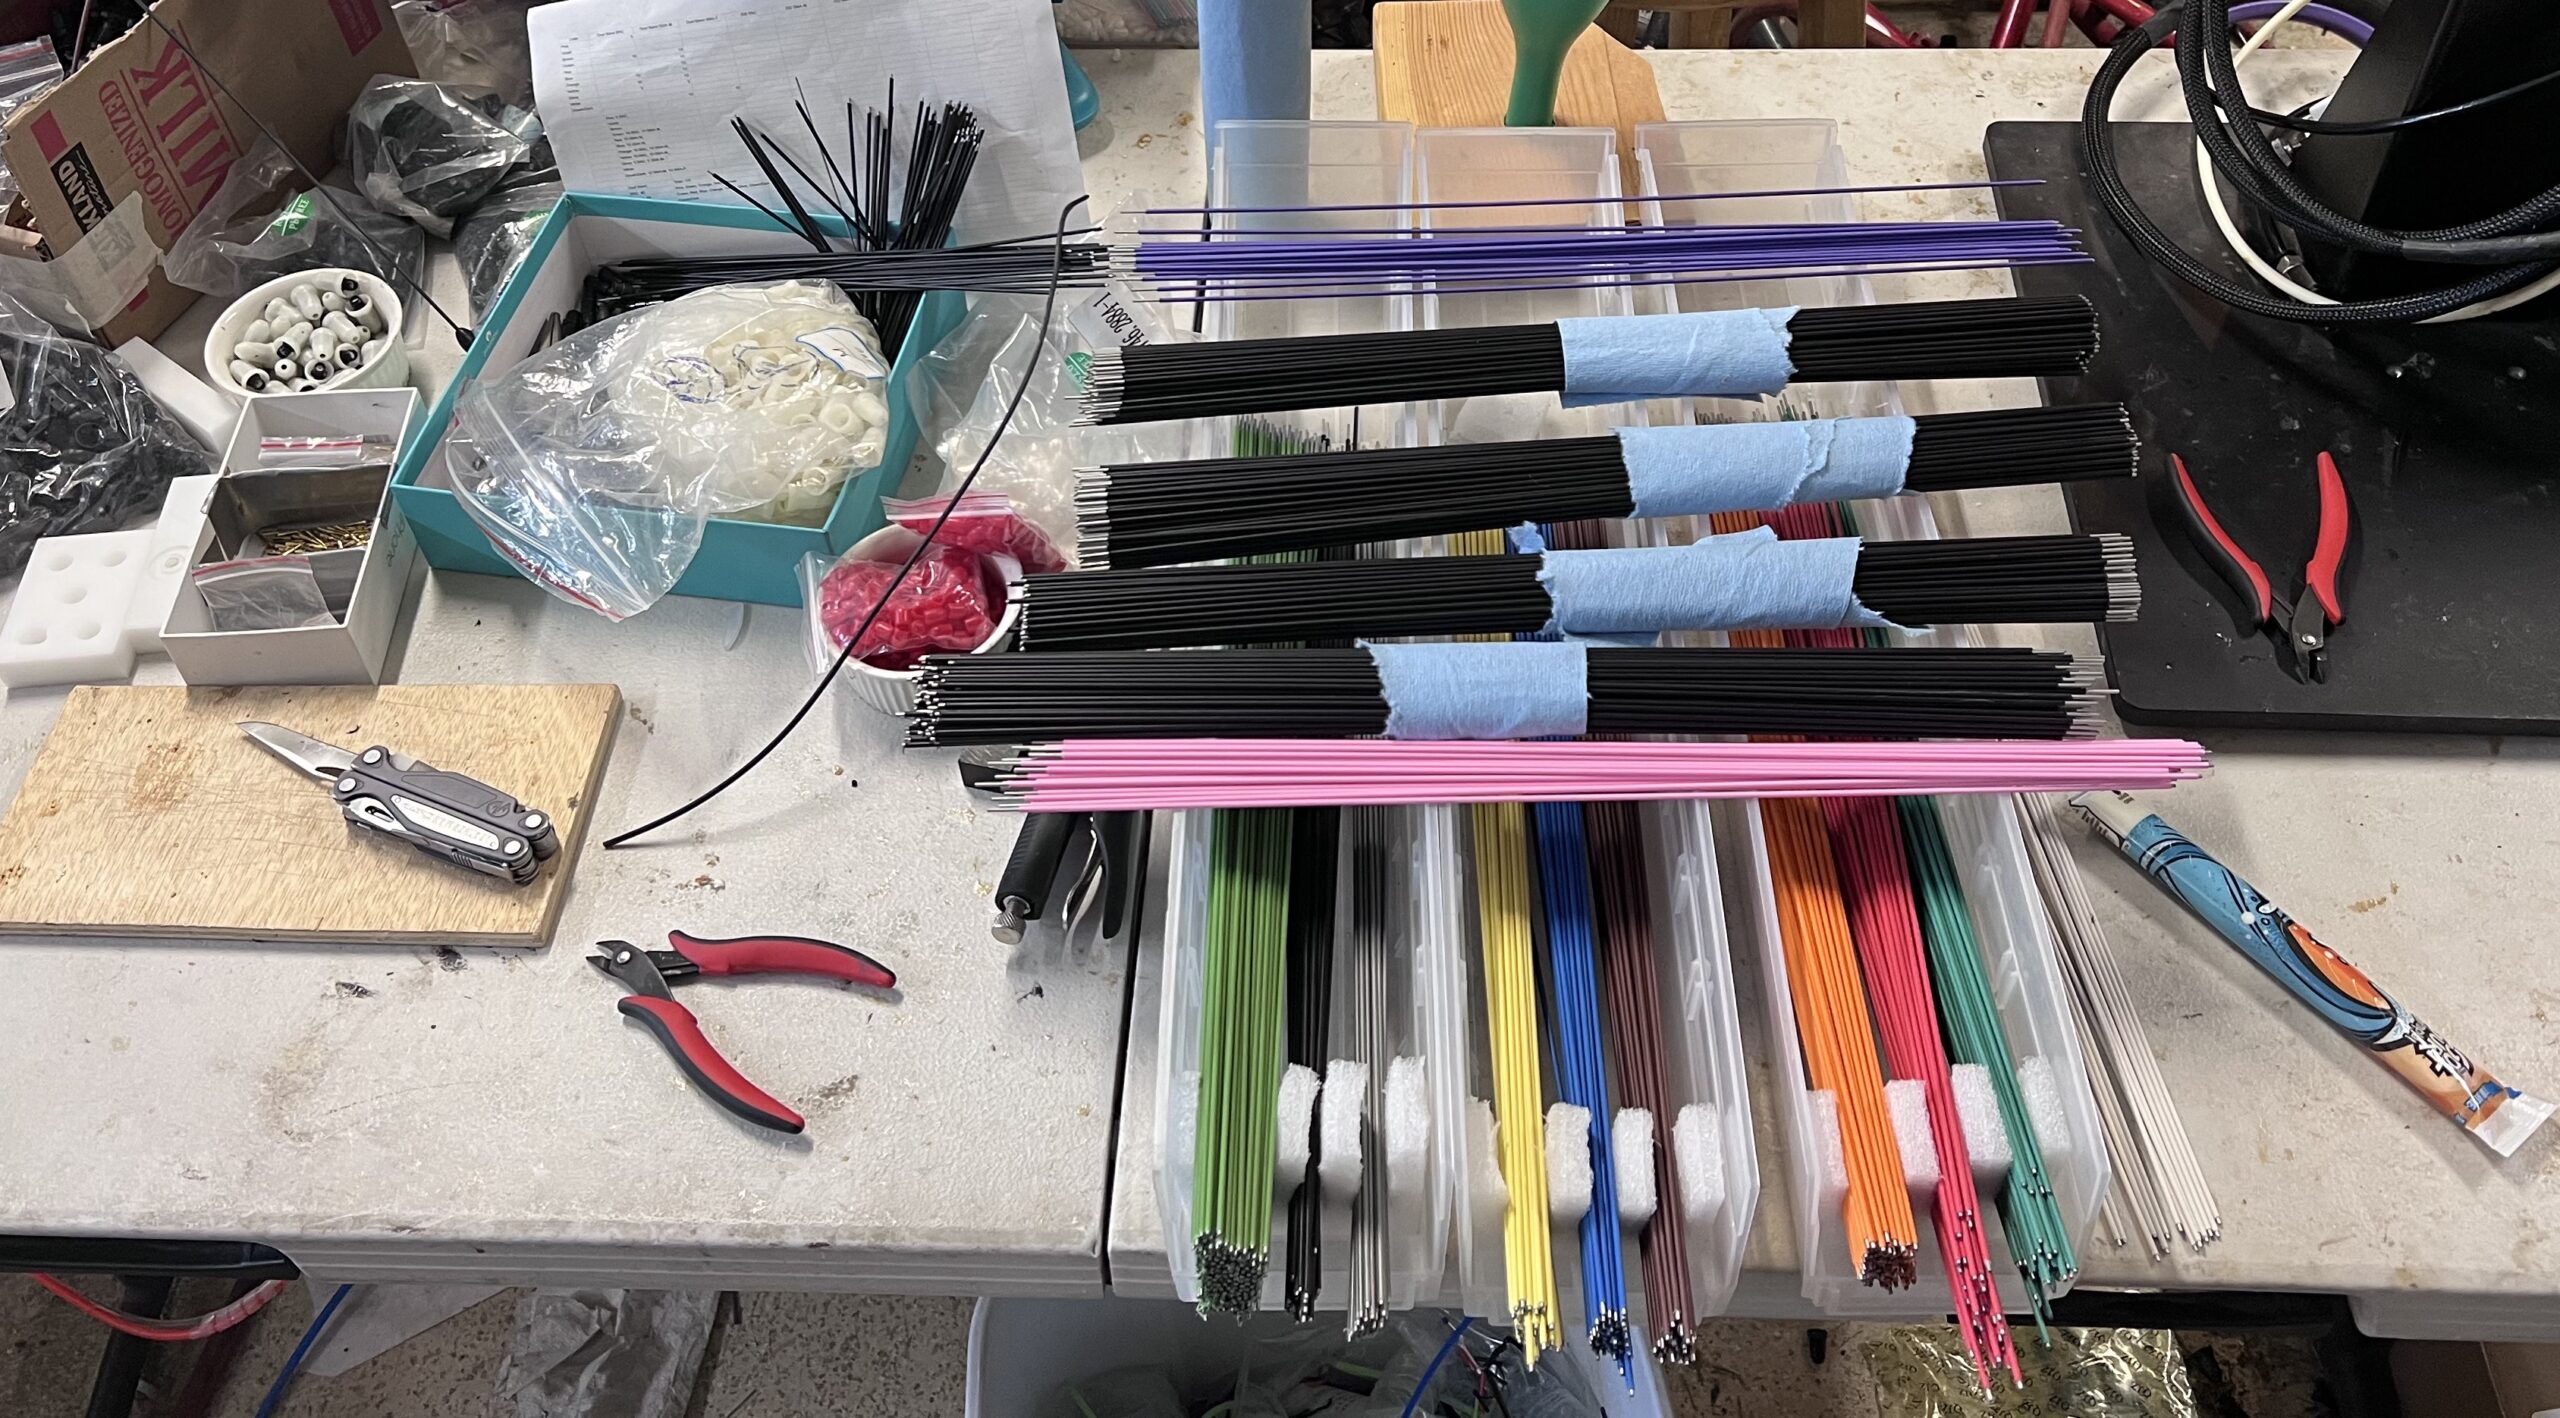
If you read my recent(ish) post on How Signal Sticks are made you know that the process — even en masse — can be rather time consuming. I started prep work on Monday by getting the heat shrink installed and trimmed; Tuesday I spend the entire day crimping pins and installing the new plastic (which arrived Tuesday afternoon). The thing is — I needed more of almost *everything*. I still had plenty of SMA-F pink and violet, but everything else I needed more of. That may not sound that bad, but to have a base of 20 of each type means 3 different connectors (BNC, SMA-M, SMA-F), 12 different colors (Pink, Violet, Brown, Green, Red, Orange, Blue, Yellow, Silver/clear, White, Glow in the Dark, and Black). That would be 720 antennas just to get that bare minimum… but I sell a lot more black than that, so I need more like 150 each of those and 50-100 of the GITD (glow in the dark) as well, so it was a very *very* busy few days.
If memory serves, this is about 160 GITD, 425 black, 20 pink, 20 violet, 50 silver, 60 yellow, 100 orange, 50 brown, 60 blue, 60 red, 60 green, 30 white… and I made more on Tuesday because I realized I didn’t have enough of some of them =]
The new injection molded parts look good!
So at the time of writing this I finished about 900 antennas last night; I think I have maybe 400 more to do adhesive on today, but I got enough to unblock and let me fill all current orders. I’ve decided to drop all 440 and 220 colors except for Black and Glow in the Dark because it just takes too much time to keep them all current and I don’t sell that many of them.
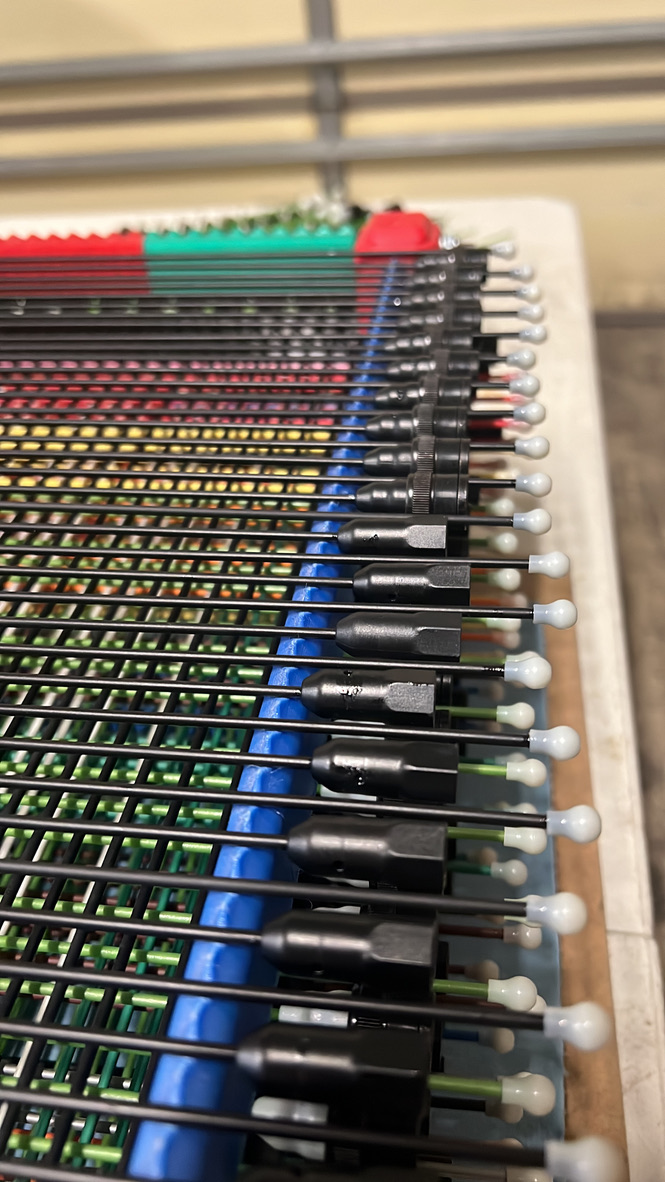
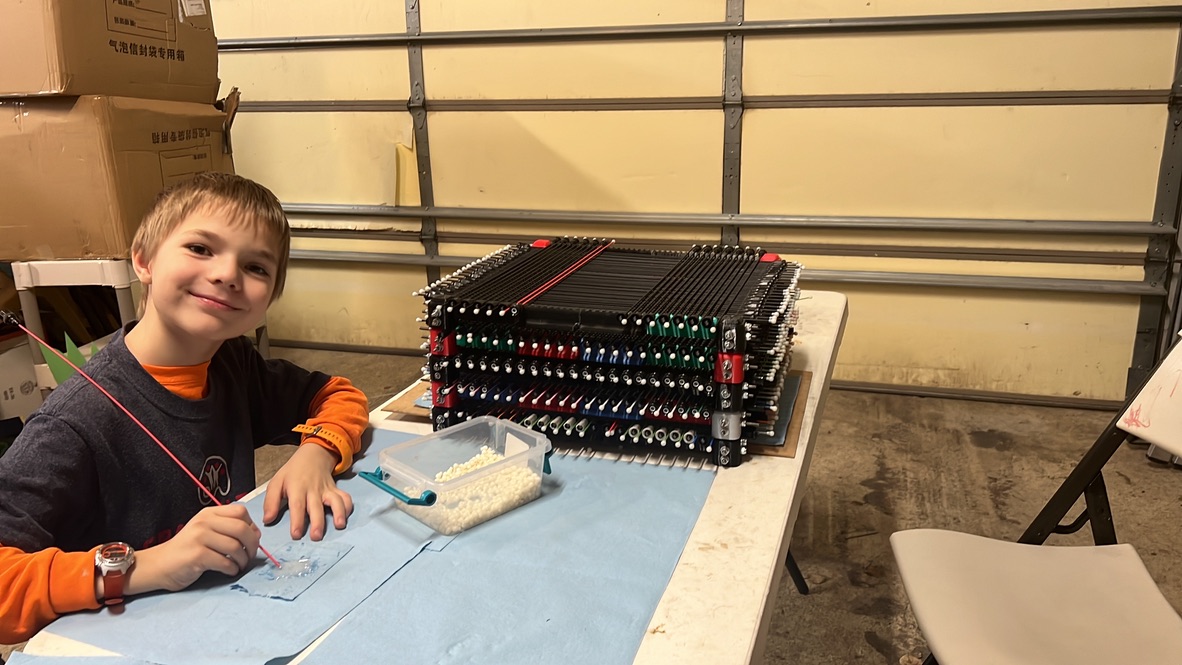
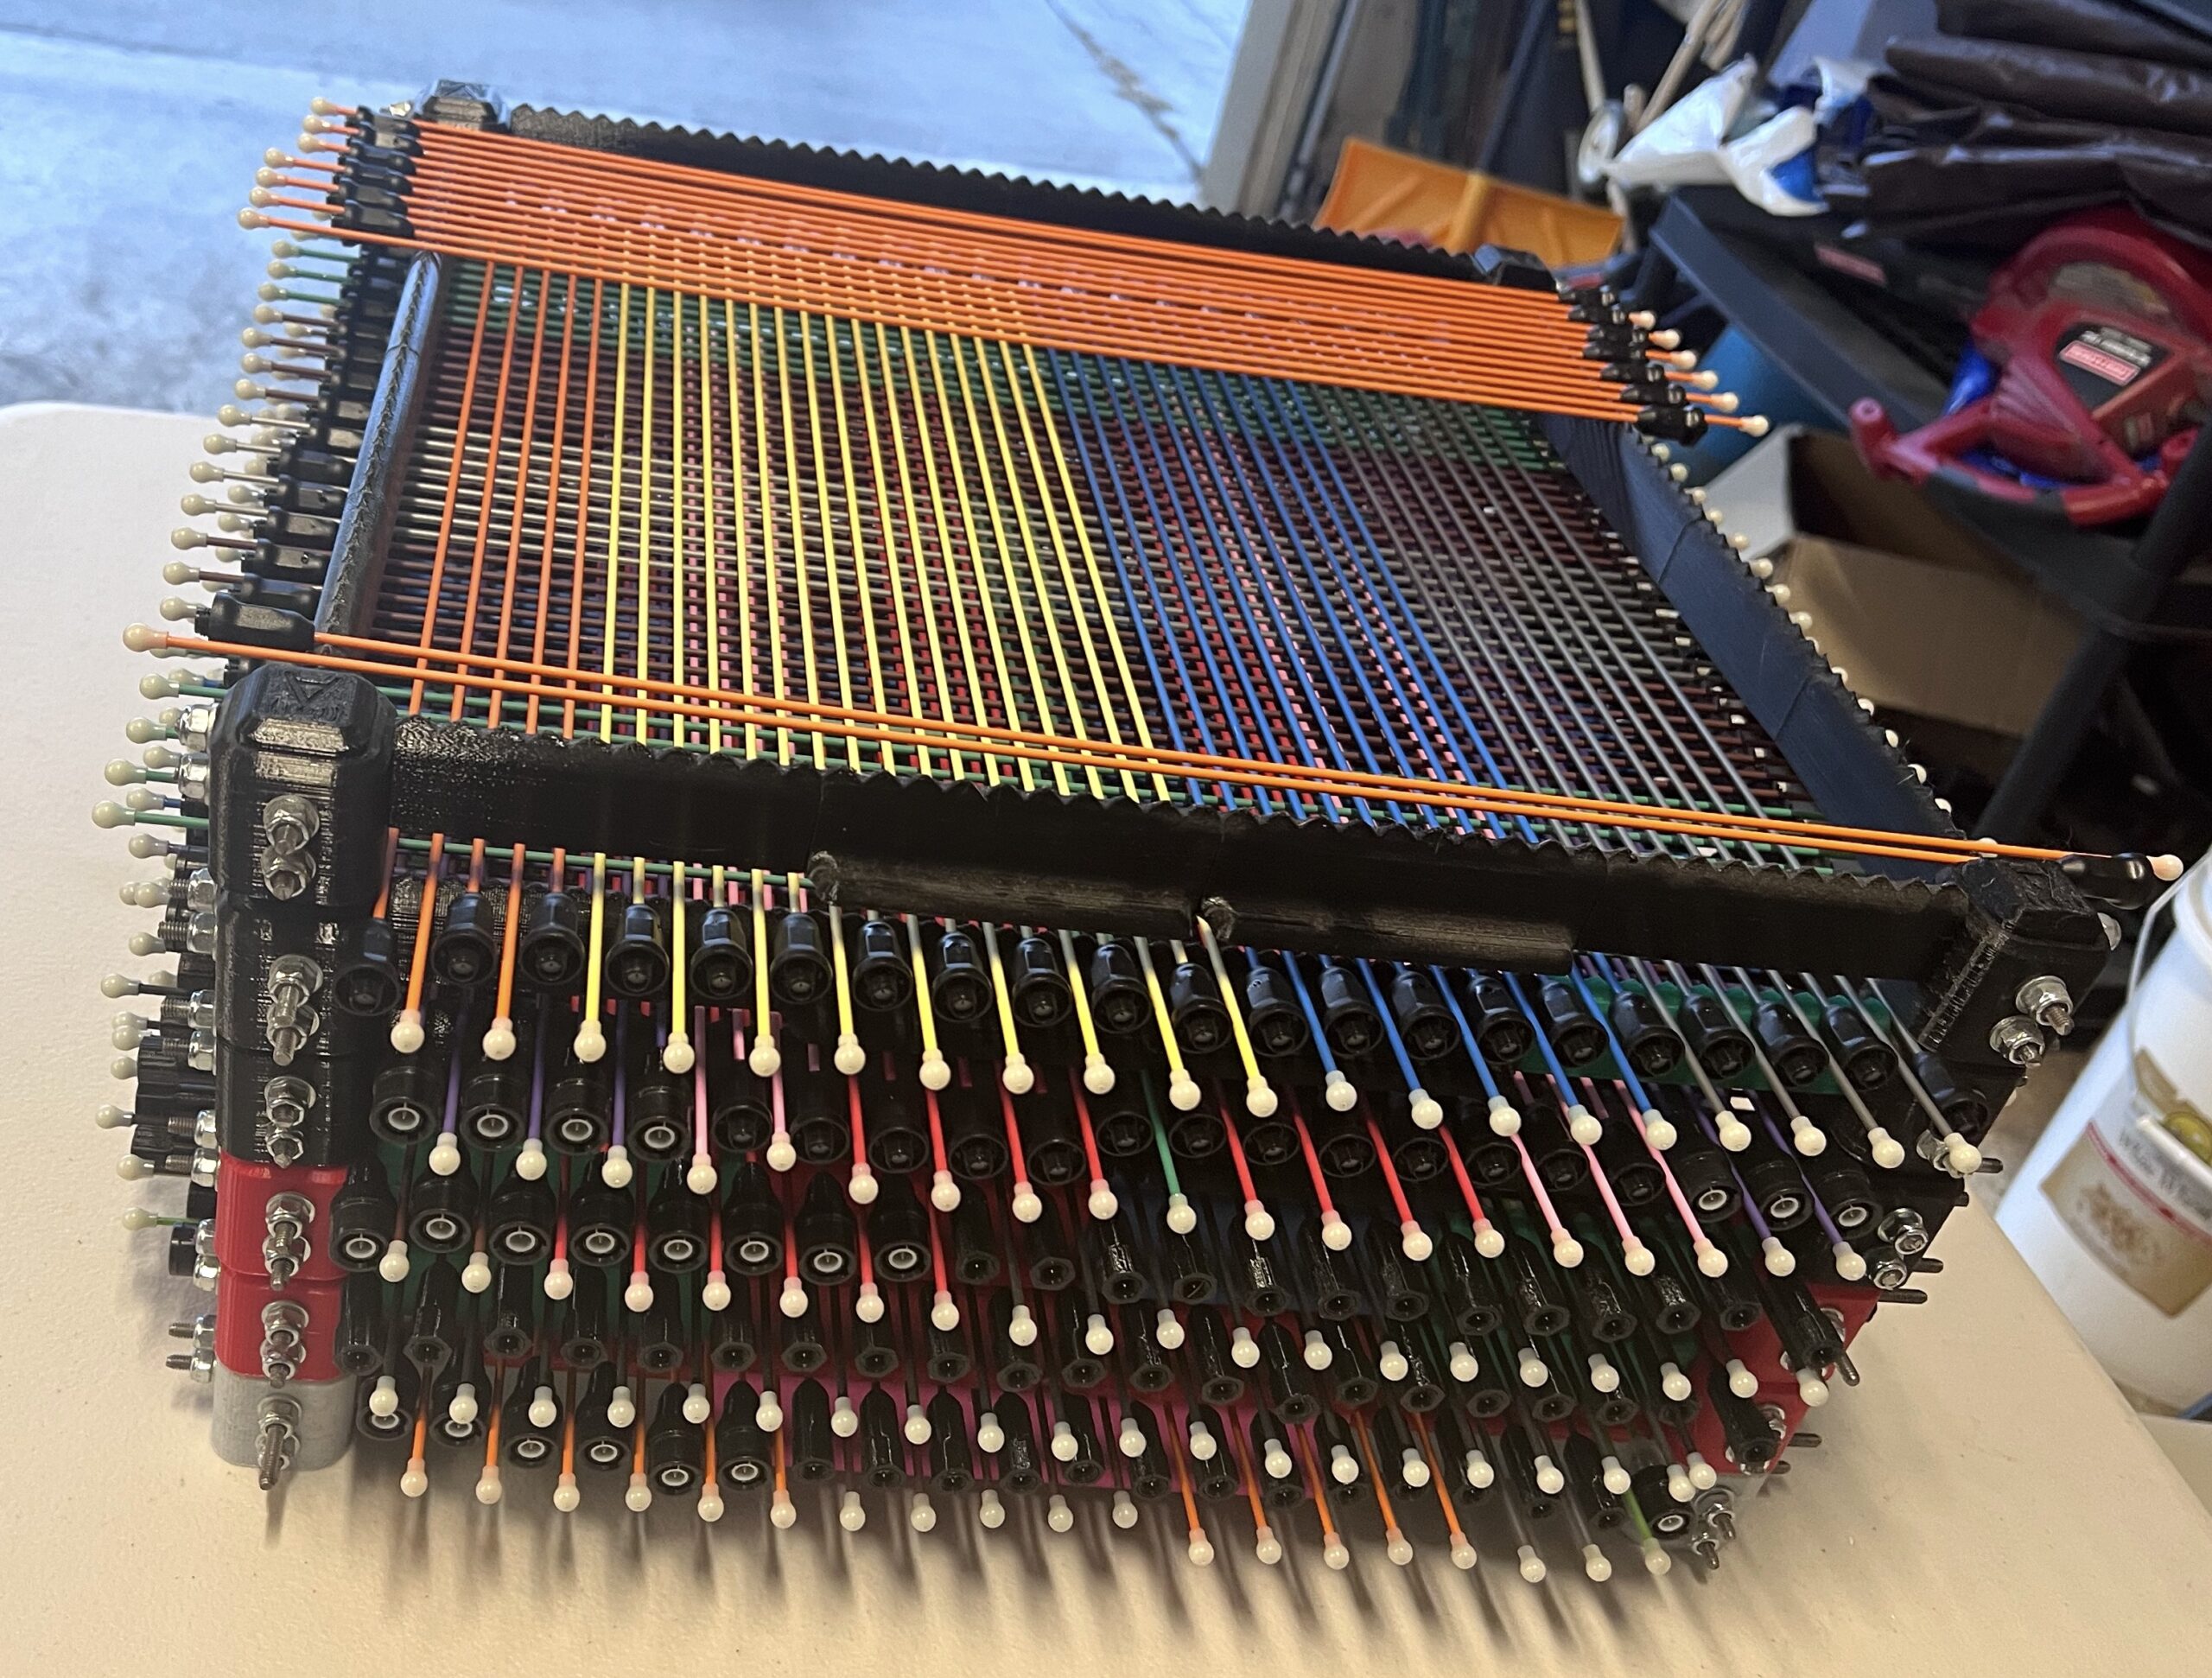
Each tray has two directions; 41 antennas fit on each tray going each direction for a total of 82 antennas per tray. Under the bottom tray there are about 115 smaller (220 and 440) antennas. This picture was taken at 5:34pm
I am really enjoying how good these parts look
I did have some help throughout the day — you can see in this picture that the stack has grown and my third son Ethan (age 9). I also had help from my brother-in-law David (KD7VQT) for much of the day. This was taken at 6:54pm.
So I finished last night at around 11pm — no, I didn’t finish everything, but it is enough to get all current orders out and today the plan will be to get a bit ahead.
9 trays; the top was not totally full (maybe 10 slots free), so that’d be 82 * 9 – 10 + 110 is somewhere around 840 antennas (I don’t have an exact count on the 220/440 antennas — because I’m lazy). Taken at 11:10pm
Conclusion
So, the obvious conclusion here is: I talk too much! However, I thought some of you might find it interesting to look at what it takes to do a sale like this for a small company like mine.
I will be offering the older model antennas for sale at a discount sometime soon — I just need to find time to set it up! Most likely it’ll be a “choose your connector and band, you get what you get” type of deal and I’ll aim at a price point roughly 50% off at least during the sale. We’ll see how it goes!
UPDATE Dec 1, 2022: The sale will begin on Dec 2, 2022 (tomorrow)! Stay tuned for details…. I need to figure them out myself.
Hi all!
I’m going to make a long story really short — I want to do a sale, I really do. Unfortunately, I have almost nothing *to* sell right now, and I don’t want to take your money when I still don’t have a definite date when that will be corrected.
I am waiting on some improved parts for SMA-M and BNC antennas — I already have them for SMA-F and the ones I have are in good condition. Sadly, those parts which should have been here by now were caught in a shipping warehouse during a 7 day COVID quarantine somewhere in China. I’m told they have been released but I still don’t have any tracking information.
There will be a sale this year!
… I just don’t know exactly when it will be yet. It will last at least as long as the black friday sale usually does and I hope to have a pleasant surprise or two to toss in with it, but in the mean time I ask you to be patient and not spend all your money in other places — save some of it for me! ;-)
As I type this it is Nov 24, 2022 — Happy Thanksgiving all! — and I expect to have parts within a week, but that’s assuming no more unexpected delays. With luck the sale will be in the next two or three weeks, but stay tuned!
For some time I’ve been debating the idea of sharing a bit of the “behind the curtain” of how Signal Stuff as a company and Signal Sticks as a product work; there are a lot of reasons for and against the idea, but my hope is that by adding some clarity around my business it will add some value to the Ham Radio community:
Who is Signal Stuff?
First, while I often use the term “we” when I talk about Signal Stuff in order to make it feel more like a company — for the most part, Signal Stuff is actually a single person. Specifically, my name is Richard Bateman, KD7BBC.
Now don’t get me wrong — it’s not important to know that because you need to know much about me specifically, but I do want people to realize that in order to understand that it is possible to create a company in the ham radio industry with a small group or a single person.
Legally speaking, Signal Stuff is actually HamStudy.org LLC — however, the HamStudy name needs to be agnostic in terms of products and distributors, so we came up with Signal Stuff and the other names (Super-Elastic Signal Stick) somewhat grew naturally out of that.
There have been many other people who have volunteered time to help me, for a time I hired someone to help with shipping and customer service, and in general I often consider Signal Stuff to be supported by a lot of people, but I think often people look at Signal Stuff and think it’s a big company — it isn’t =] If I go on a family vacation I have to put up a note that shipments will be delayed because they run out of my basement :-)
Building Signal Sticks
Okay, enough about the boring stuff. I had someone ask me recently if Signal Sticks were really “hand made” as is claimed in our marketing materials, so let me show you a bit about how it works! The paranoid part of me is worried that I’ll lose business by doing this — what if people realize they could do it themselves? But really the basic design is one that has been known for a long time — it’s just a quarter wave “piano wire” antenna.
I should also mention that I no longer do all of this myself — I have hired a local assembly shop who makes most of the black antennas and I mostly do just the colored ones since those are harder to order with enough advance notice to have them done externally. That said, they use the same parts and steps, so this all still applies =]
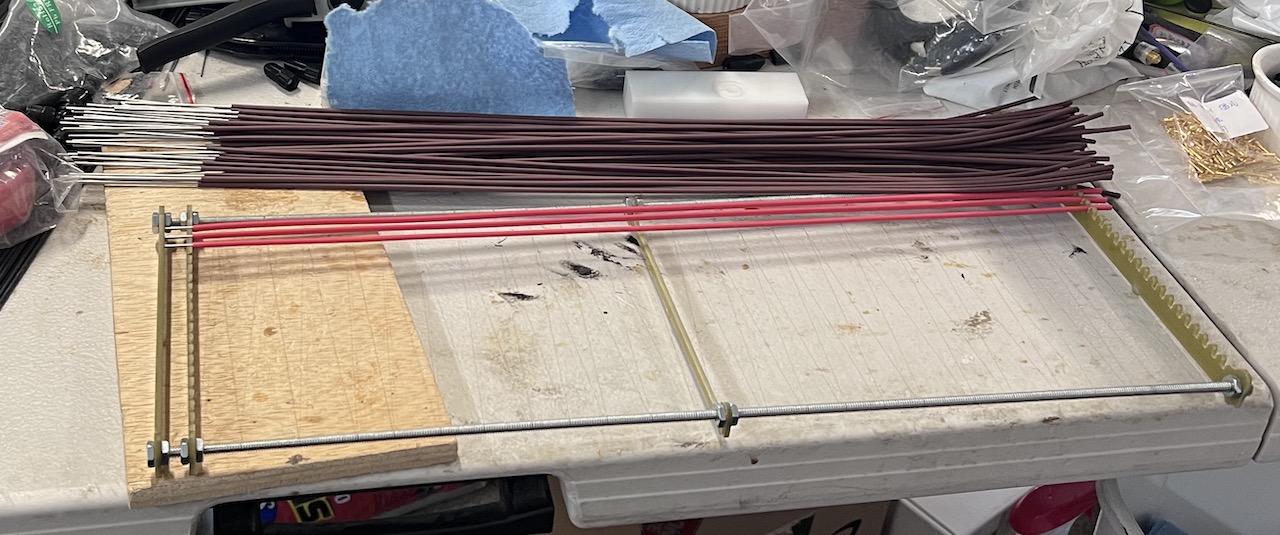
Step one: Apply heat shrink
This is one of my custom-build heat shrink trays and the wire above ready to put on the trays.
One of the most interesting things about building these is that while making one isn’t hard, it gets a whole lot harder when you are making hundreds of them. The first year I sold these online I think I sold about 300 antennas — which was huge, I couldn’t believe I sold so many. In the first three quarters of 2022 I have sold almost 10,000 antennas — that is a *lot* of antennas to make without special machines.
The wire is purchased pre-cut and specially treated so that the adhesive will bond better. Care has to be taken to ensure that oils from our skin doesn’t get on the wrong part of the wire, otherwise the adhesive may fail and the antenna will need to be replaced.
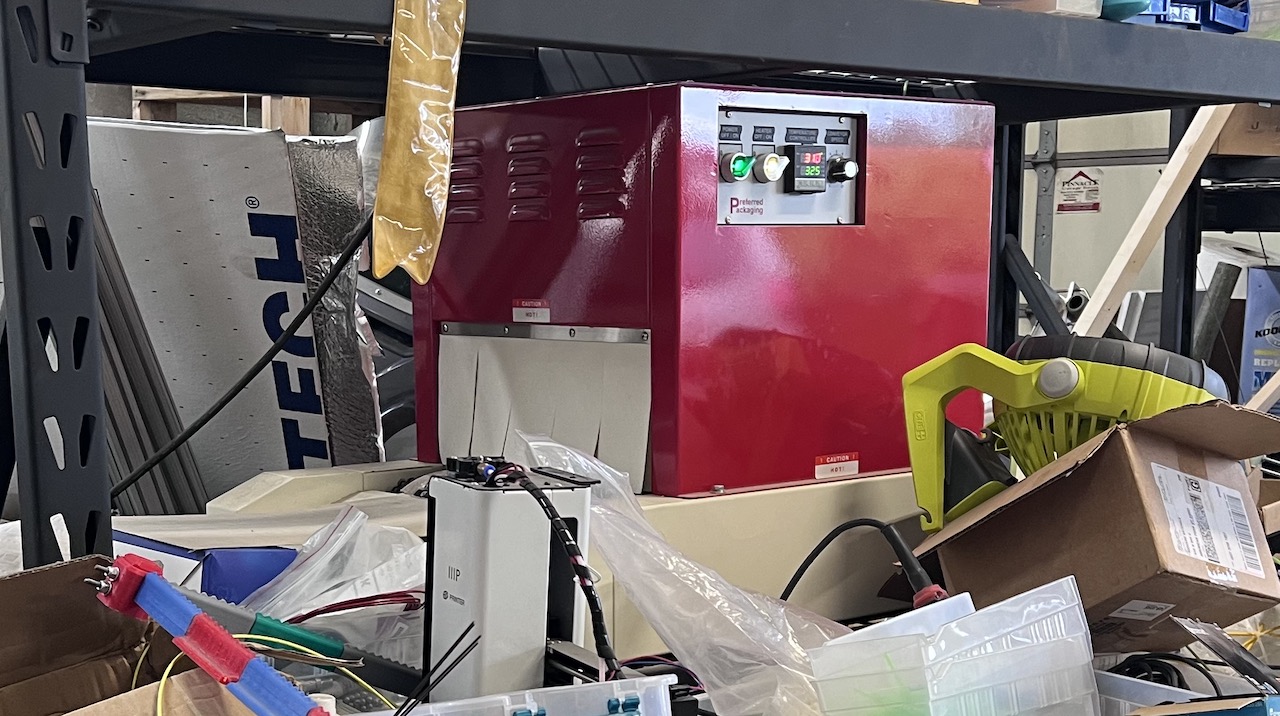
In the picture above you can see one of the custom heat shrink trays that I designed and made — I designed it in Fusion360, milled the parts on my CNC machine, and then assembled. Each one holds 20 antennas and it has to be able to handle 325°F. It would take *way* too long to apply the heat shrink using a heat gun (believe me, we used to do it all the time and it was … painful. sometimes literally…), so a few years ago I purchased a heat shrink tunnel such as is used for shrink wrapping products.
You can clearly see in all of these pictures that I am habitually organized and neat….
The trays hold the wire with the heat shrink and keep the shrink far enough back that the adhesive can still bond to the wire, rather than just to the heat shrink. The heat shrink itself is custom ordered (I had to buy over 60KM of heat shrink to manage that…) to be thicker and tougher than the stuff you’d normally buy at a store. I have a heat shrink cutter that I had to buy to cut the shrink to the correct length. We learned an important lesson about safety one year when my oldest son cut about 1/4″ of his pointer finger off and we had to go get it stitched back on at the ER on Christmas Day…. so if you ever get one, always turn it off when loading or unloading *PLEASE*.
Step two: Clean up heat shrink
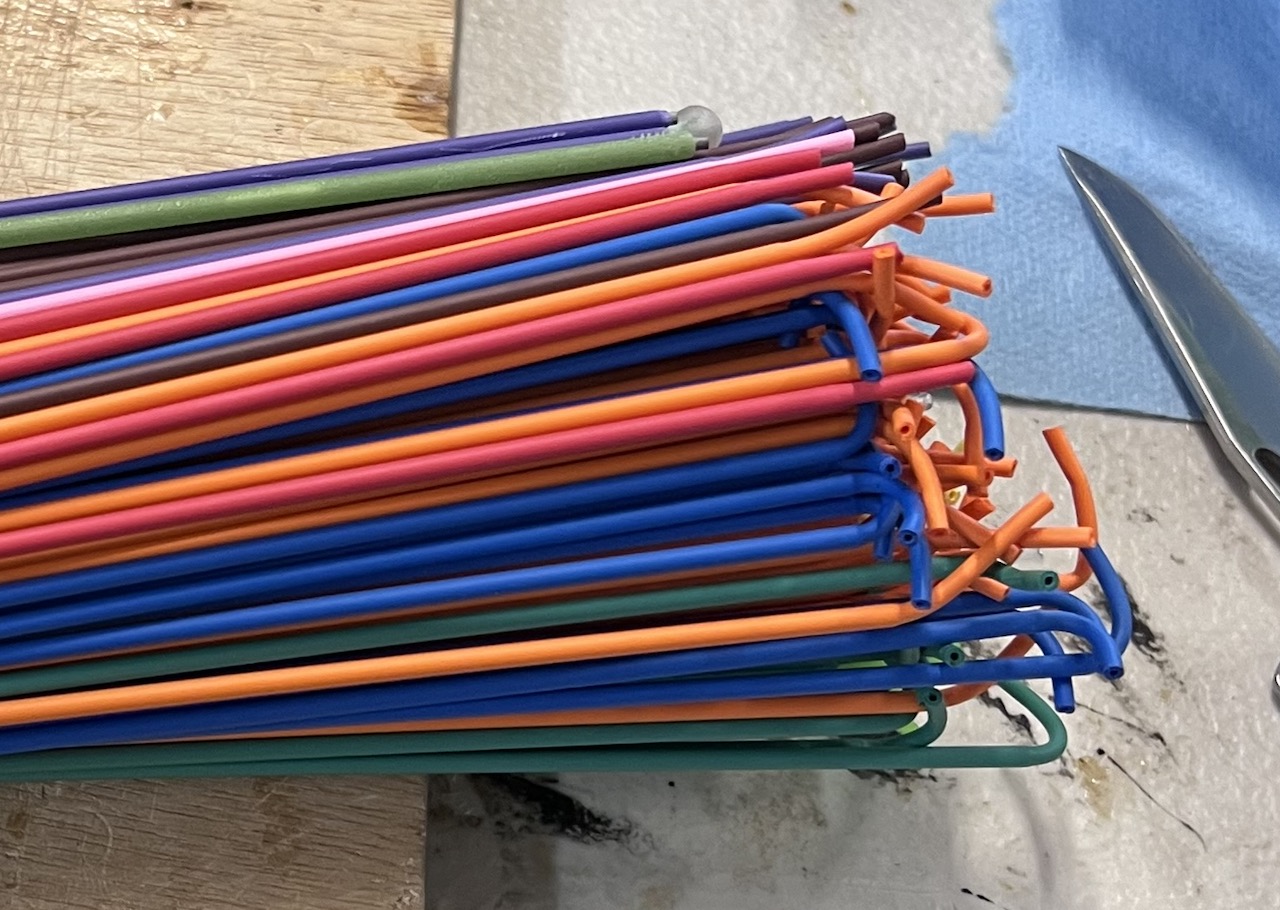
This is a stack of the wires after the shrink has been shrunk — note the part sticking off the end on the leftJust because, here is a closer look at the untrimmed ends
After shrinking them the wires have heat shrink sticking off the end; you might naturally think that one could just figure out the correct length so that doesn’t happen, but in practice there is too much variance in the rate of expansion for that to be viable. Instead it needs to be trimmed off the end — and if we don’t want the tip to come off easily then there needs to be a little bit of wire exposed so that the adhesive can bond to it.
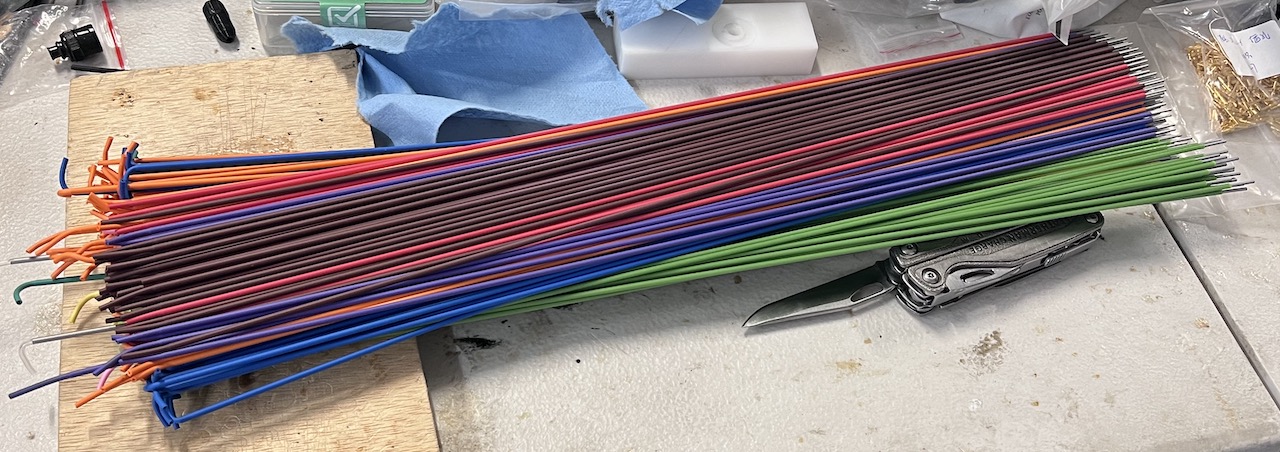
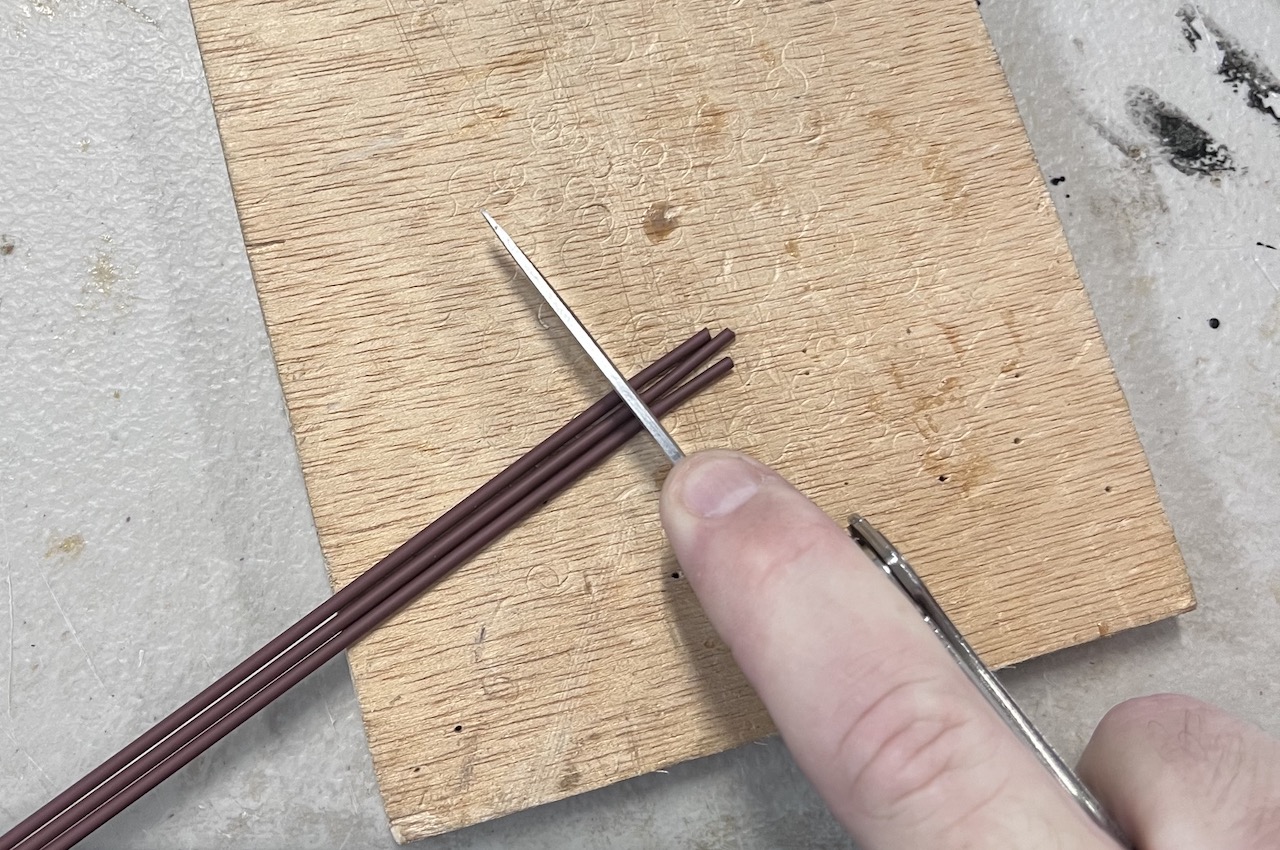
I have tried making tools to help with this step but for me at least they always take longer than doing it by hand with my leatherman.
This is one of the first steps where you wouldn’t expect there would be all that much skill involved, but after doing literally thousands of these I find I’m able to trim 3-6 at a time where most people end up just doing one or maybe two at a time. You would think that using a razor/utility knife would work better but I find my leatherman to be the best tool for the job — which is convenient, since I always carry it. I have found that I can do this step faster than any other person I’ve trained, so when time is tight this is one of the steps I do myself even when I have help.
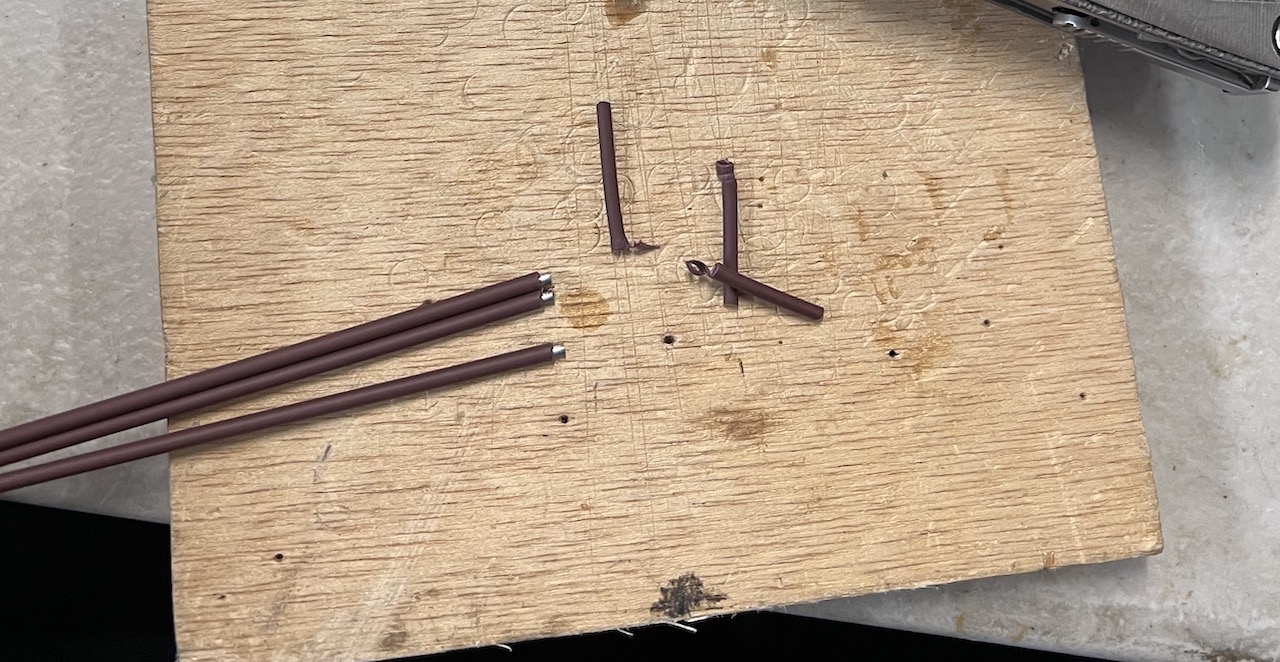
A little exposed wire must be left at the end, otherwise when we bond the tips they will only bond to the heat shrink and will come off if the shrink stretches.
This doesn’t look all that hard, but keep in mind that with this particular build I didn’t need to just trim three of them — I was out of stock on a number of different colors and styles, so I was building about 400 antennas that day.
Step three: Install the center pins
I have tried a lot of different ways to install the center pins over the years — crimping, soldering, wire glue, …. but soldering takes too long and wire glue is not effective enough. Finally I ended up getting custom connectors made which allow me to crimp them all with the same tool, which has made things much simpler.
These are BNC pins
Here is another step where one isn’t a big deal, but have you ever sat down and tried to crimp RF connector pins onto 400 wires? These days I use a pneumatic crimp tool, but it’s still definitely a time consuming process. There are of course different pins for each connector type, plus two different sizes of wire because I use smaller wire for both 440 and 220 monoband.
Step four: Prepare and then install the connectors
The connectors that I use originally were just regular RF connectors for coax which happened to fit the wire size I needed, but at this point they have been customized to better fit the plastic covers I designed for them and also to use the same parts for both sizes of wire. While I realize it’s generally taboo to discuss financial details on an open post like this, my last order for connectors and adapters I had to split into two payments because the processor I used could not send more than $20,000 per day. It’s a weird feeling when your orders get into that range and you’re still building these in your garage….
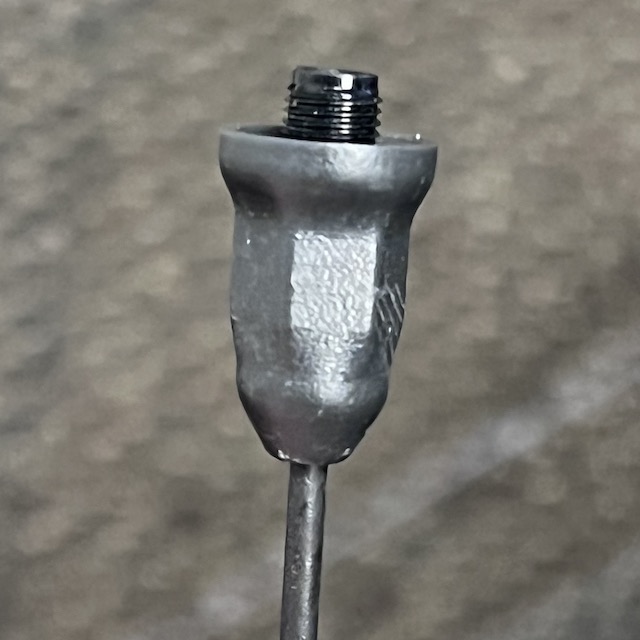
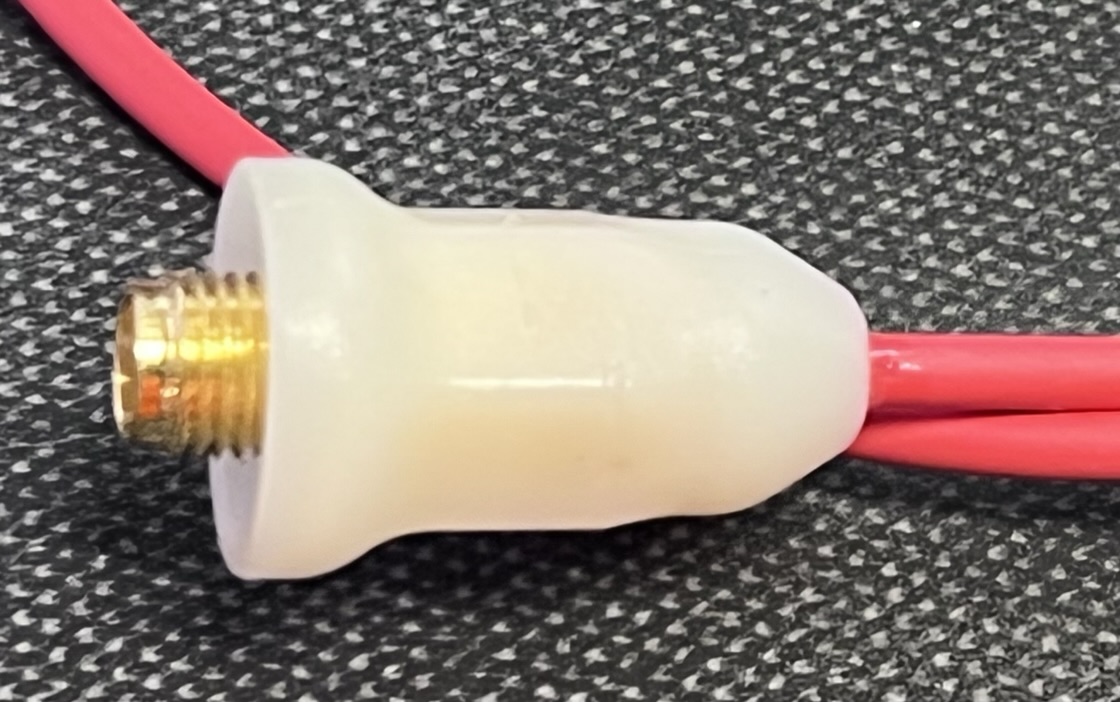
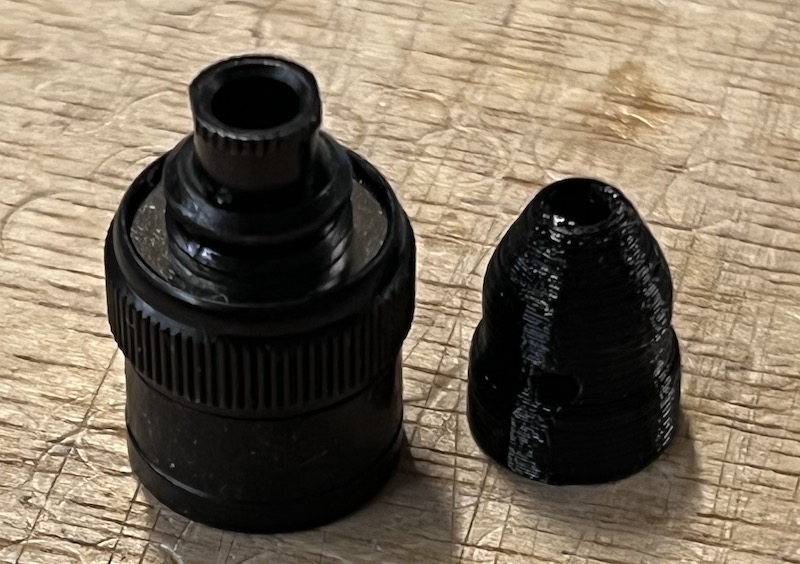
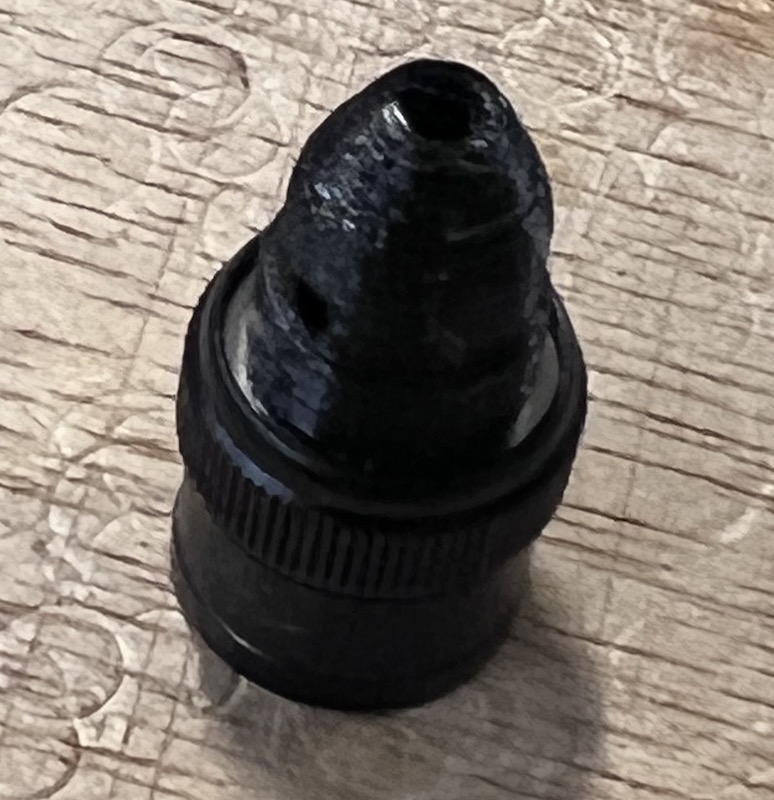
This is my BNC connector side by side with the “glue cap”This is the BNC connector with the “glue cap” installed
This is two steps in one because before putting the connector on the antenna you first need to install what I call the “glue cap”. The glue caps have gone through more iterations than any other part of this process — when I bought my first 3d printer back in … 2017, I think? … I immediately realized that I needed a way to justify the purchase. (that’s the healthy order to do things in, right?). One of my brainstorms — and likely the single most impactful brainstorm of my life — was that perhaps I could use them to make it easier to build antennas. That single thing completely revolutionized my antennas.
Once that’s all ready then the wire can just be inserted — though we do need to make sure it’s inserted all the way. After one memorable build night with volunteers I found 83 antennas which did not have the center pin inserted all the way after the adhesive had fully cured. It was not cost-effective to rebuild them, so I ended up needing to just throw them away.
The purpose of the glue cap is to hold the adhesive (technically not glue =]) in place while it cures (not dries…) so that it will bond to the correct parts of the antenna to make things come together. Every glue cap for every signal stick ever sold with a 3d printed cap was printed on one of my 3d printers in my basement. That said, I expect by the end of 2022 I will be making all the antennas using injection molded parts — they look better, are easier to use, and while the total cost will probably exceed $20K to make all the molds I have finally decided it’s time to just do it.
Final step: Apply the adhesive
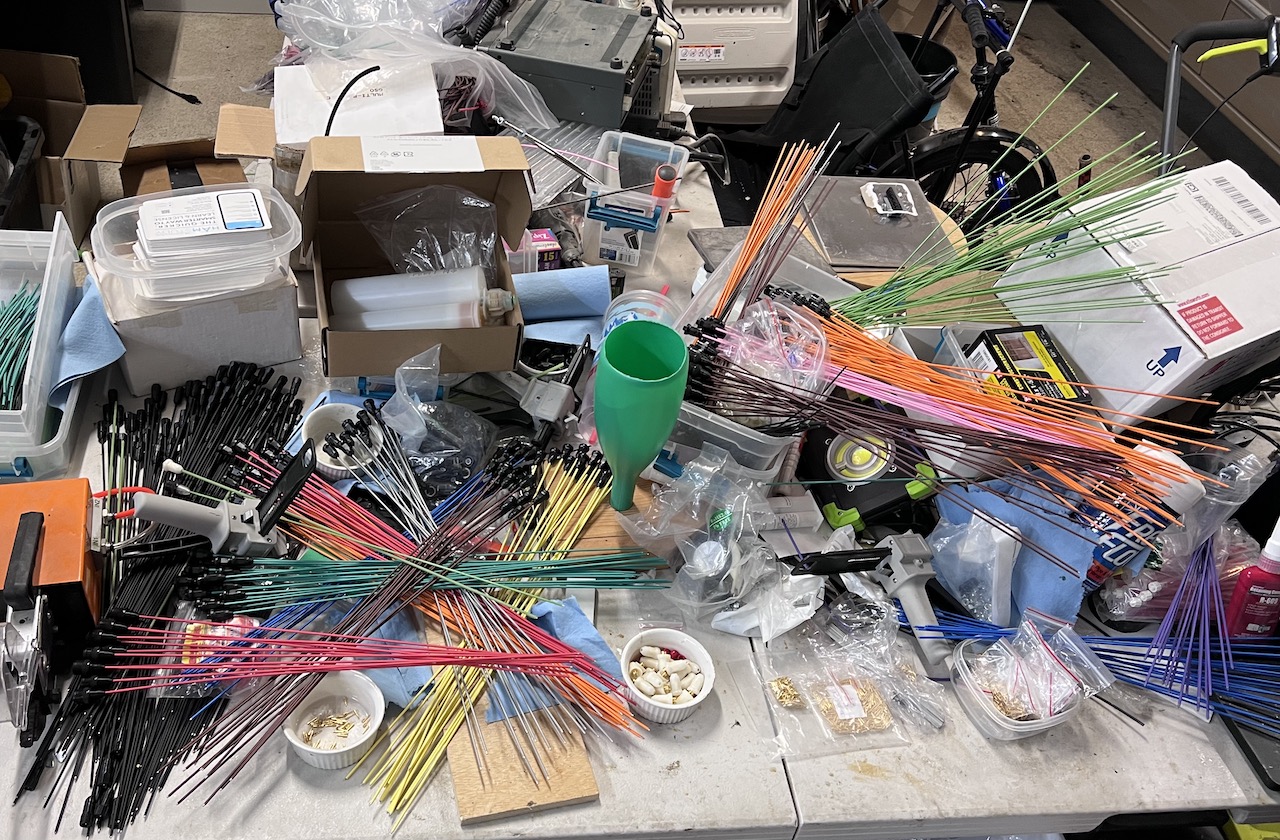
It’s important to keep your work area organized so you can cleanly organize everything when it’s ready for adhesive
At this point they are technically usable, but they will also come apart if you pull on the wire much at all. The final step is to inject a 2-part adhesive into the hole on the side of the connector. We used to mix the adhesive is a small cup and use popsicle sticks to apply it before sliding the cap on, but that required a lot of skill to get right and we still had a lot more manufacturing defects. This leaves a slightly unsightly hole on the side, but it is more reliable — and that has always been the overriding goal for me.
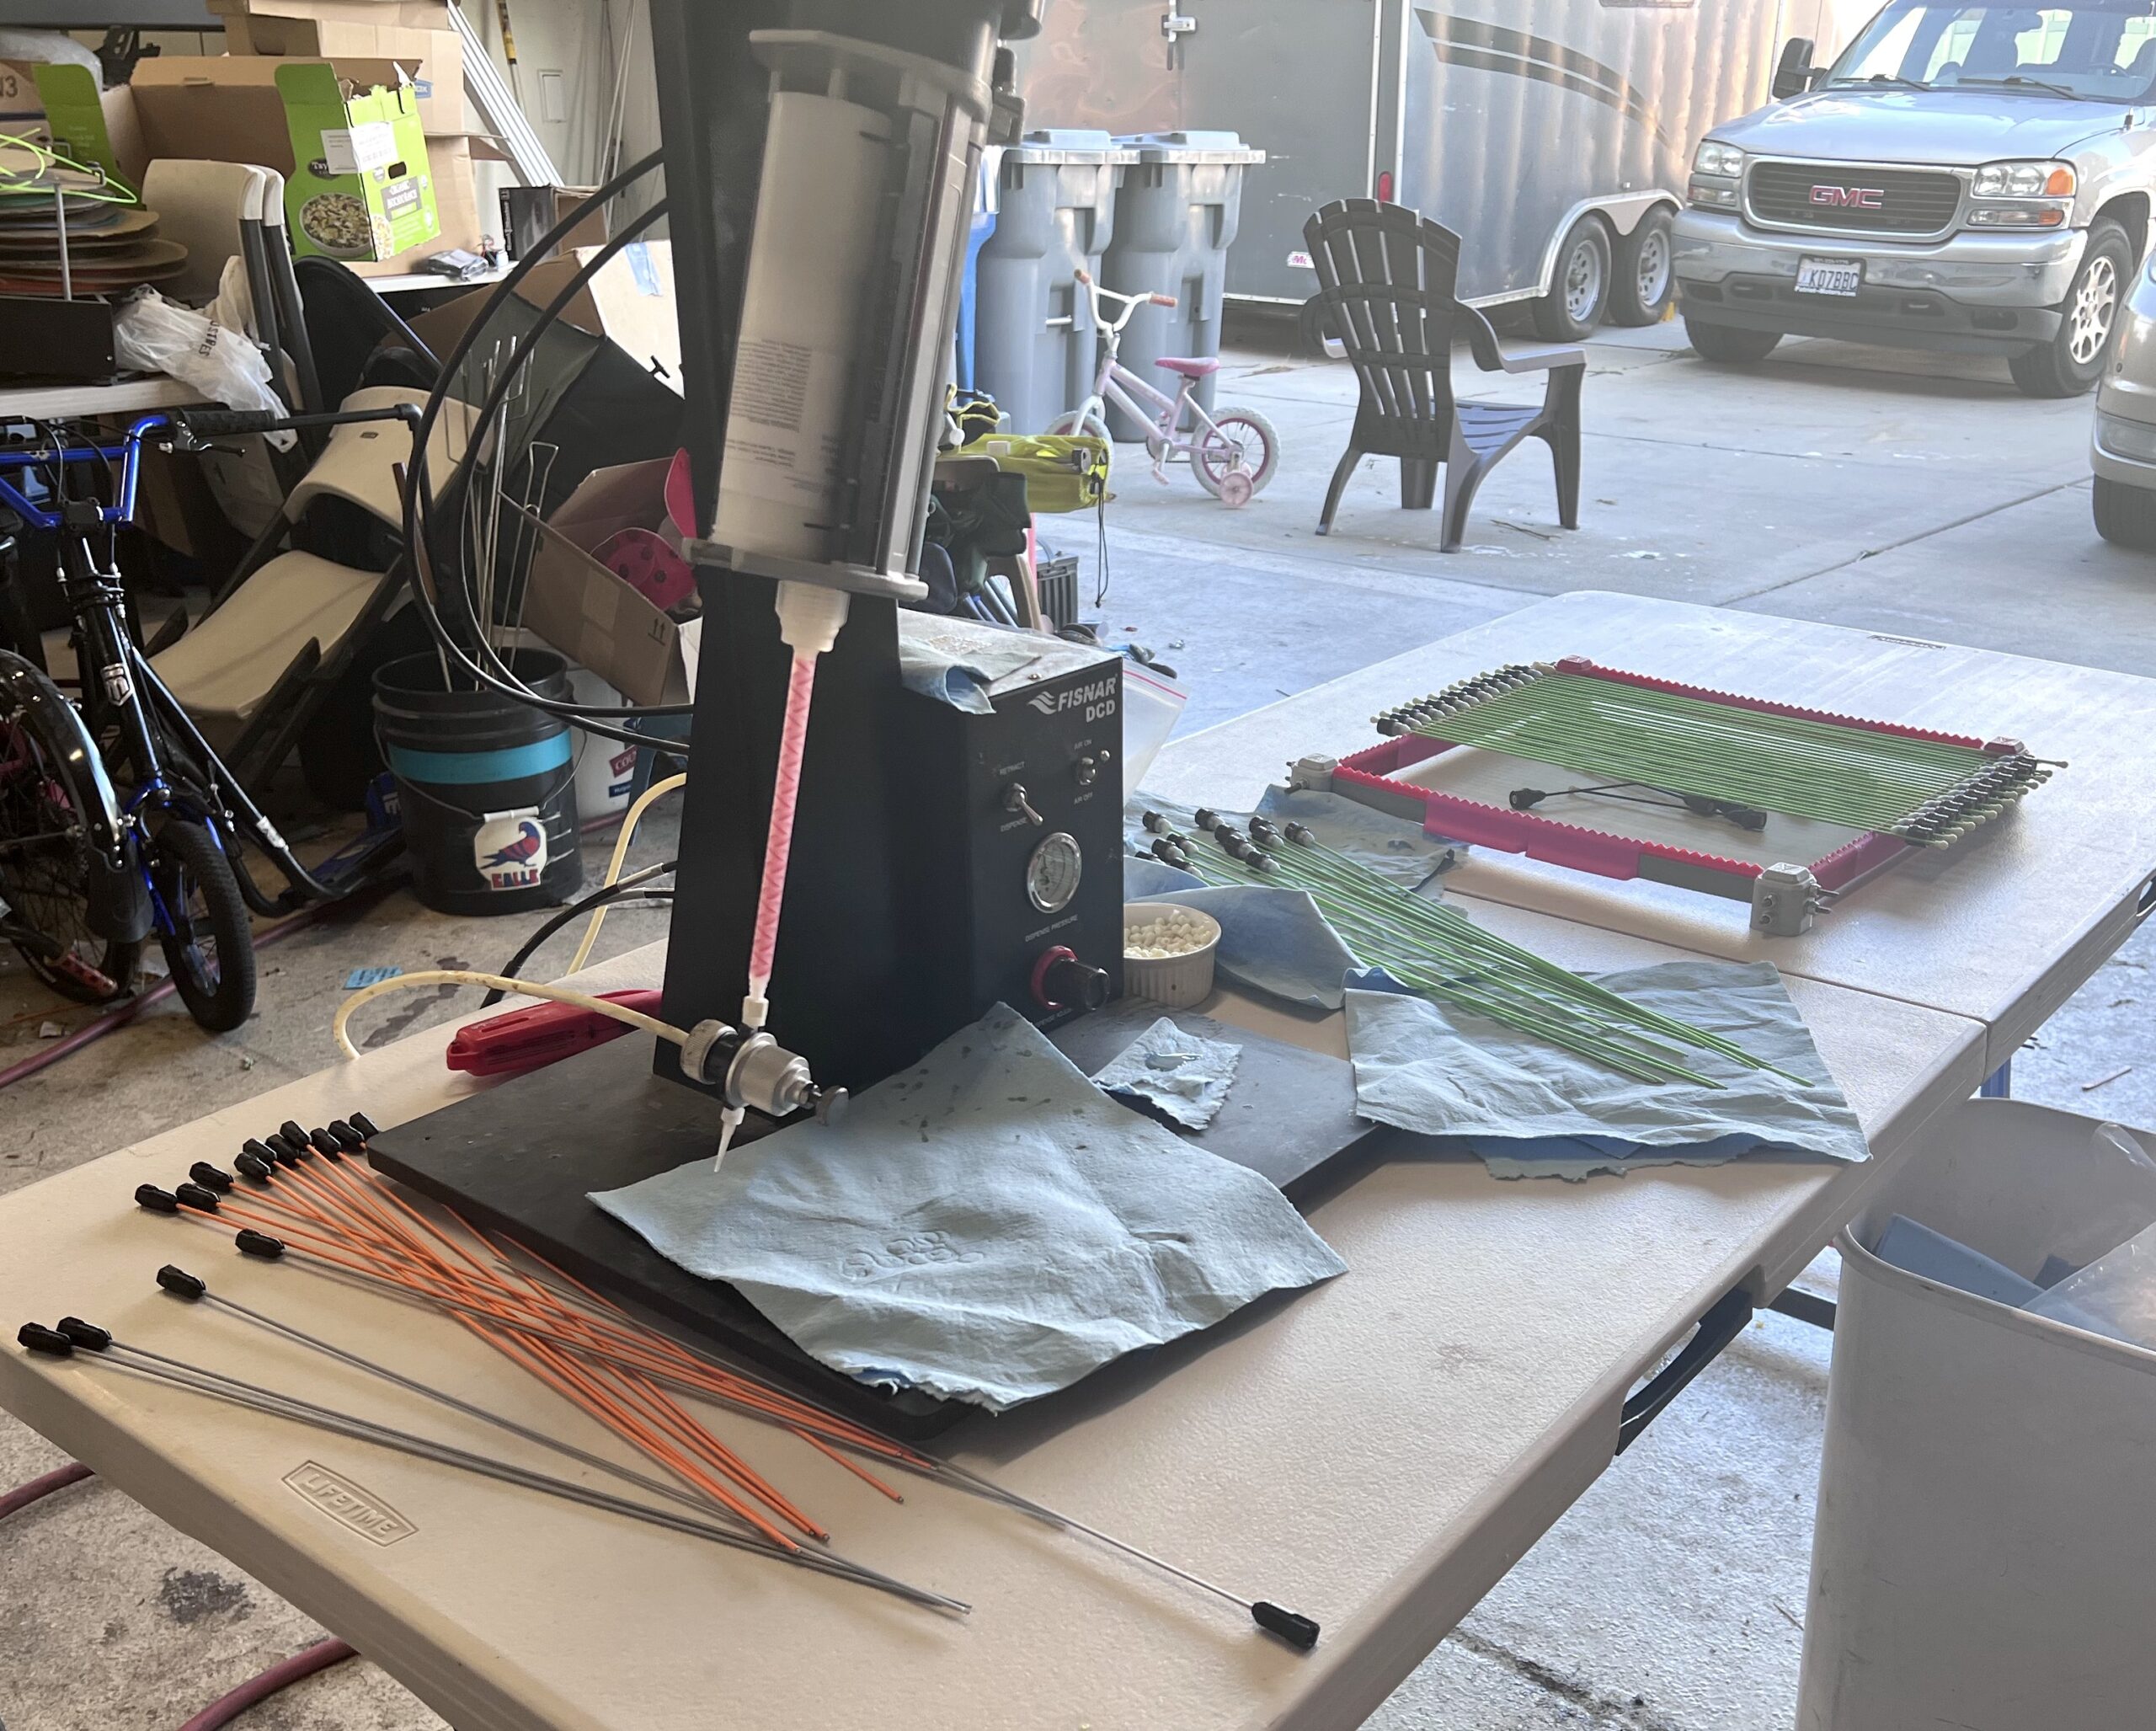
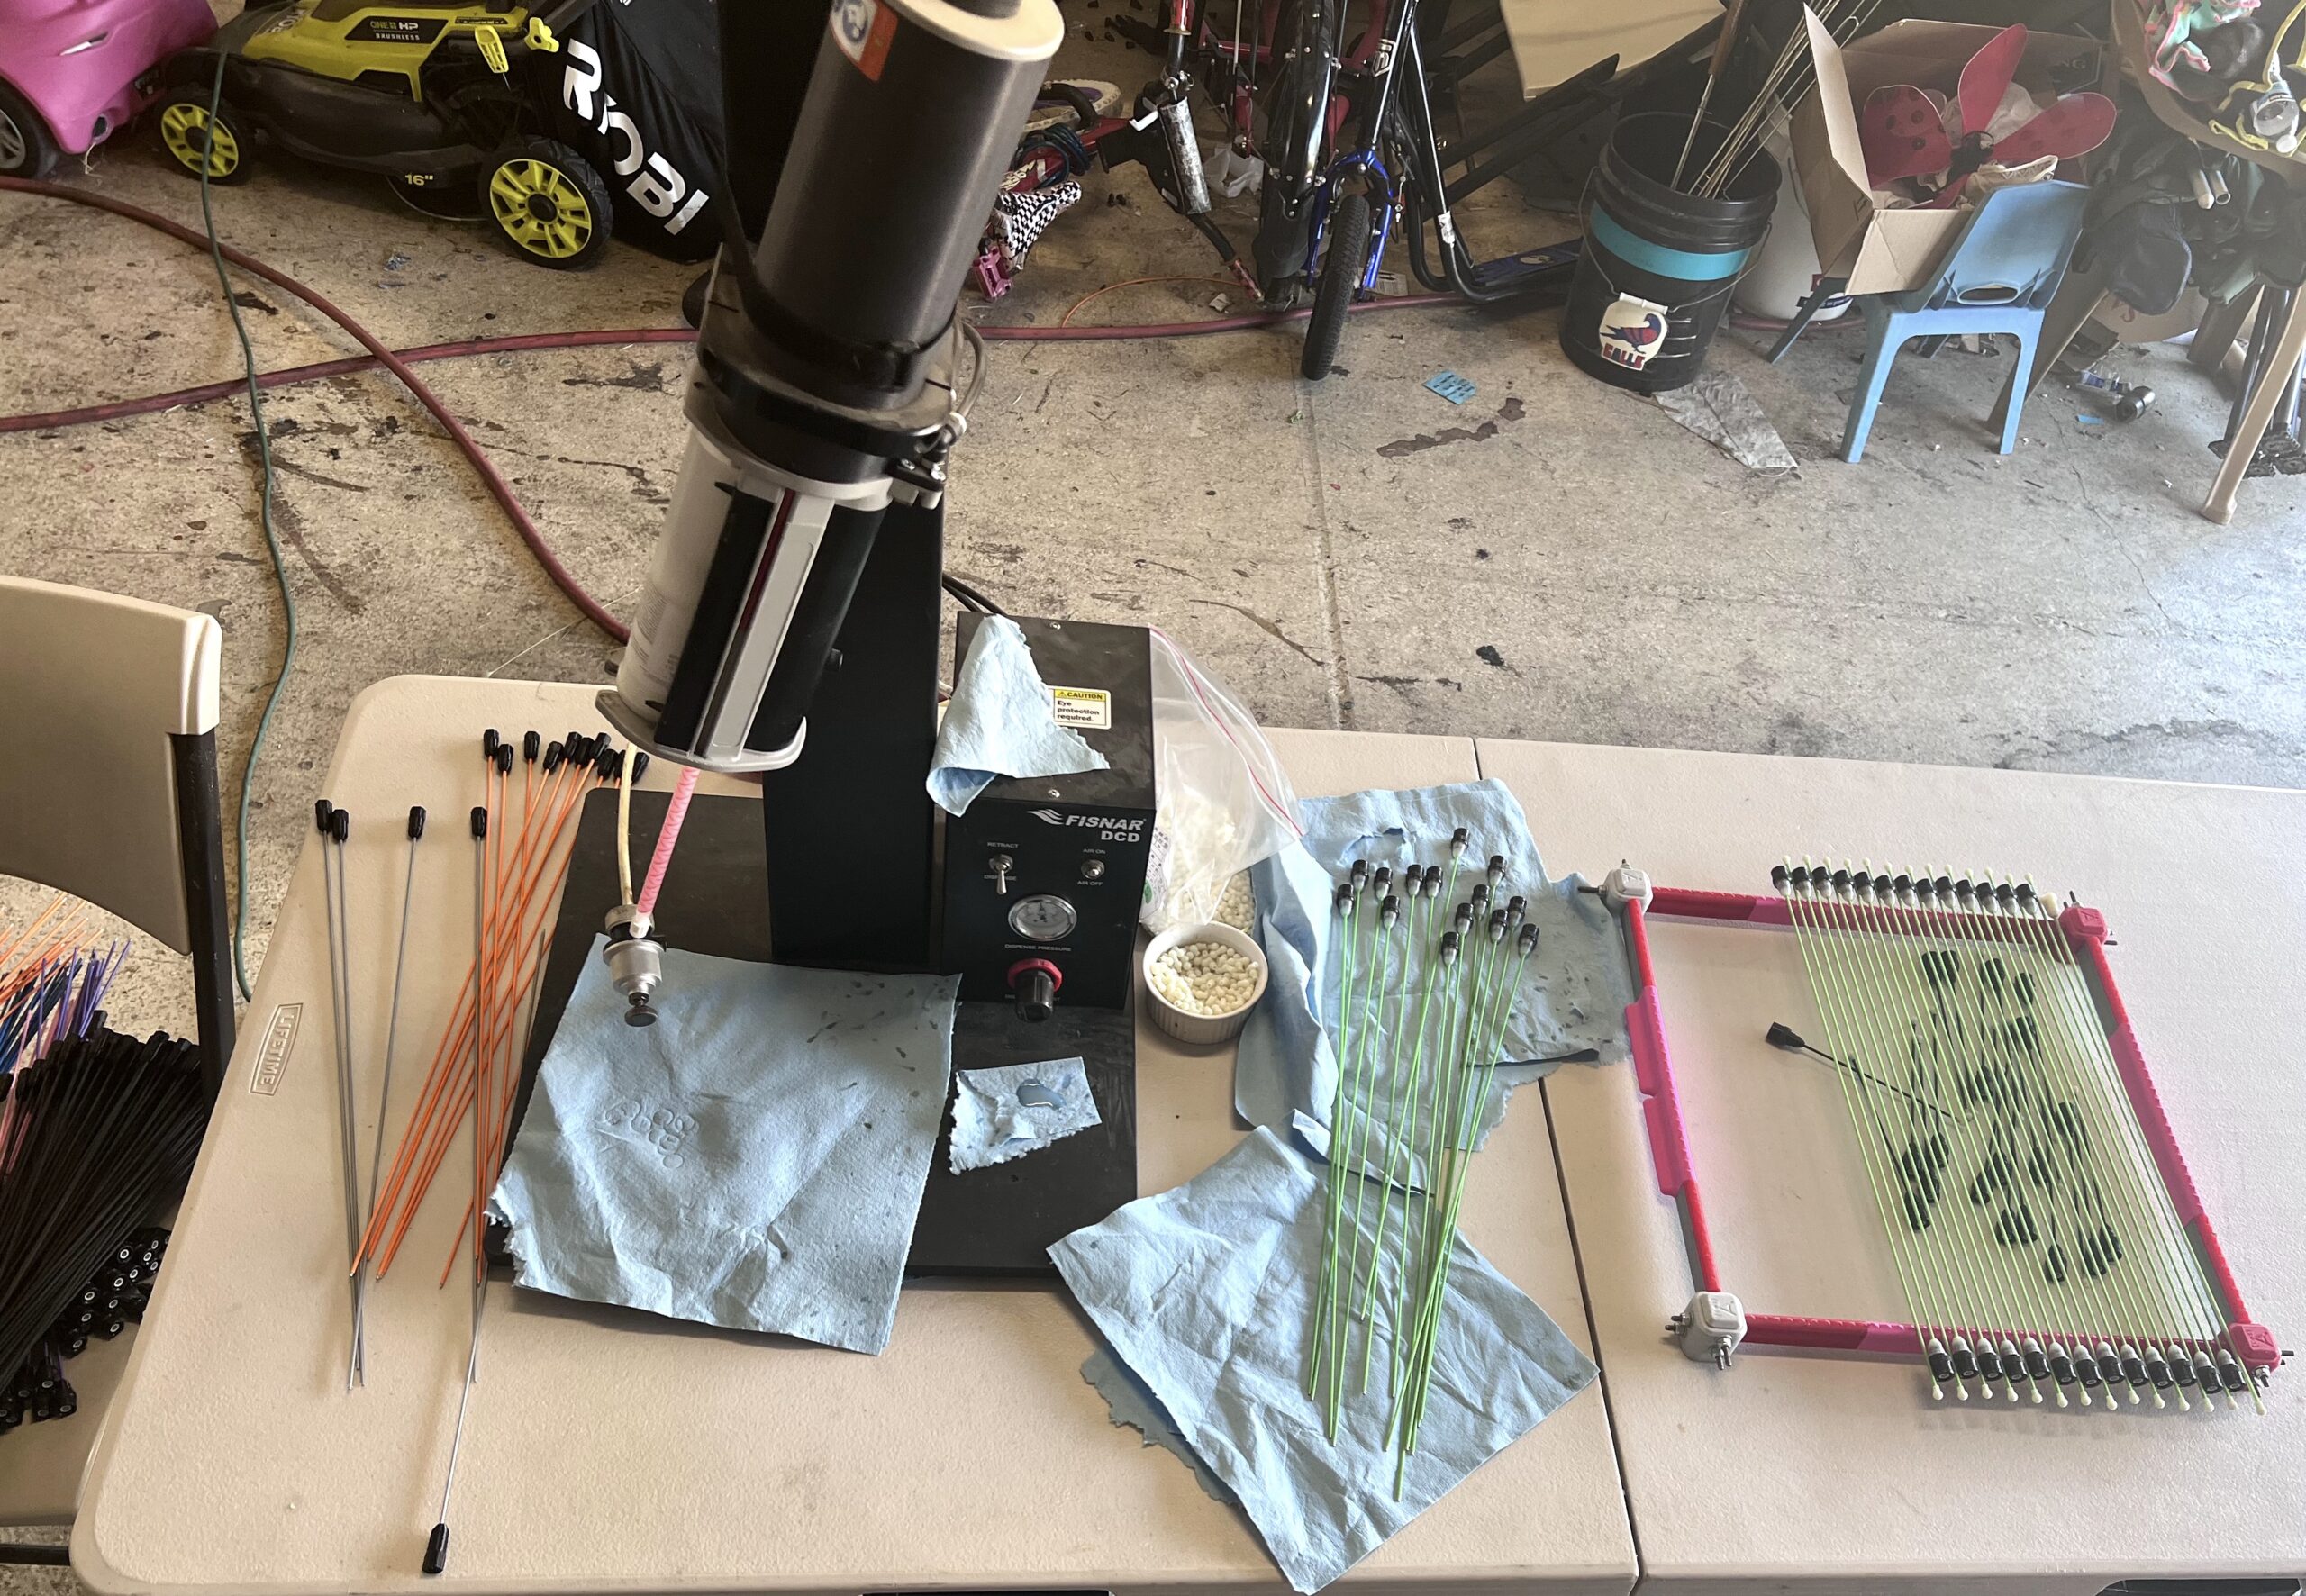
I originally used small handheld dispensers, but these days I use this foot-controlled pneumatic dispenserI use this to inject the adhesive and then clean up any extra that comes out as needed.
This is the final step and it is both the most important and also the most difficult to do correctly. If you get too much adhesive in then you have to clean it off — and if it somehow gets onto the threads that might not be possible. If there are any issues and you don’t catch them during this step they cannot be fixed.
There are also two sides to this task — first, you need to inject the adhesive, and then you need to do any cleanup needed and also install the tips, which these days are also injection molded.
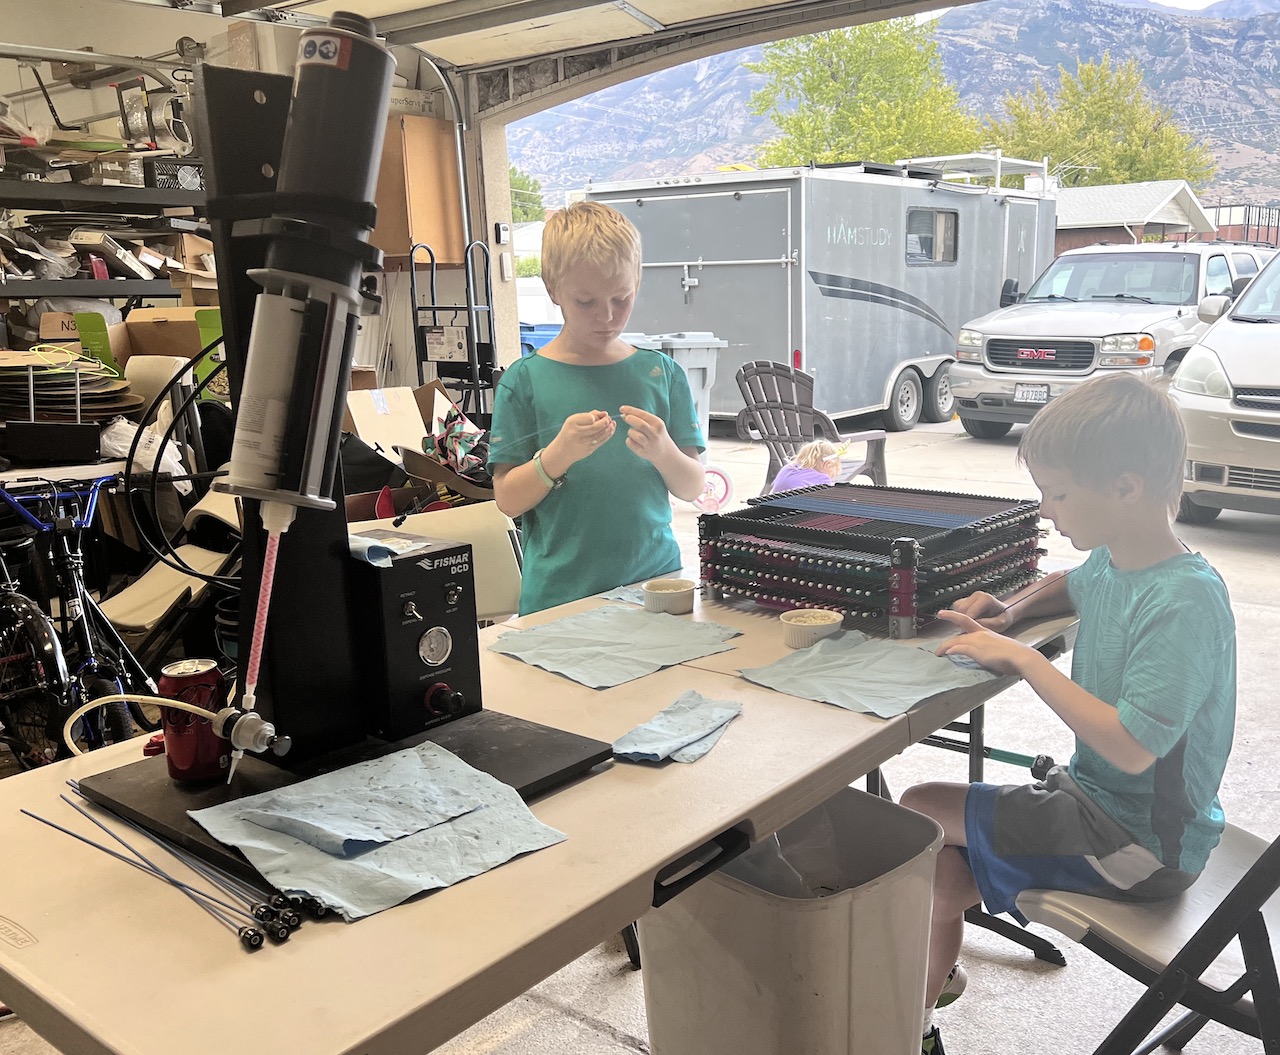
These are two of my helpers — Dallin and Ethan — who have become particularly adept at installing tips and helping with the cleanup.
This is the step which benefits most from an extra pair of hands and fortunately I can usually get two of my children to help. I do the adhesive injection and part of the cleanup and they install the tips and then place them on the curing racks. Those racks, incidentally, are also custom designed and 3d printed =] You can even make your own with this model file!
Back before COVID nearly all signal sticks were made during a volunteer-driven build night — 10-15 people would come over to my house and I’d feed them pizza while we made antennas. Everyone would leave with an antenna, a few with a door prize, and it was actually pretty fun. That’s been harder in the last few years, so I haven’t done it with more than a few people in quite some time, but the reason it is relevant is that we used to use pizza boxes to stack the antennas on because the box for a large pizza was just about the perfect size. Unfortunately, those were problematic to stack and could not be moved easily without antennas falling off.
With the new racks I can now move a whole stack of antennas out of the way so my loving and amazingly tolerant wife (Sariah, KC7KEI) can put her vehicle back in the garage; they also stack vertically.
The antennas need to cure for 12-24 hours and then they are ready for sale!
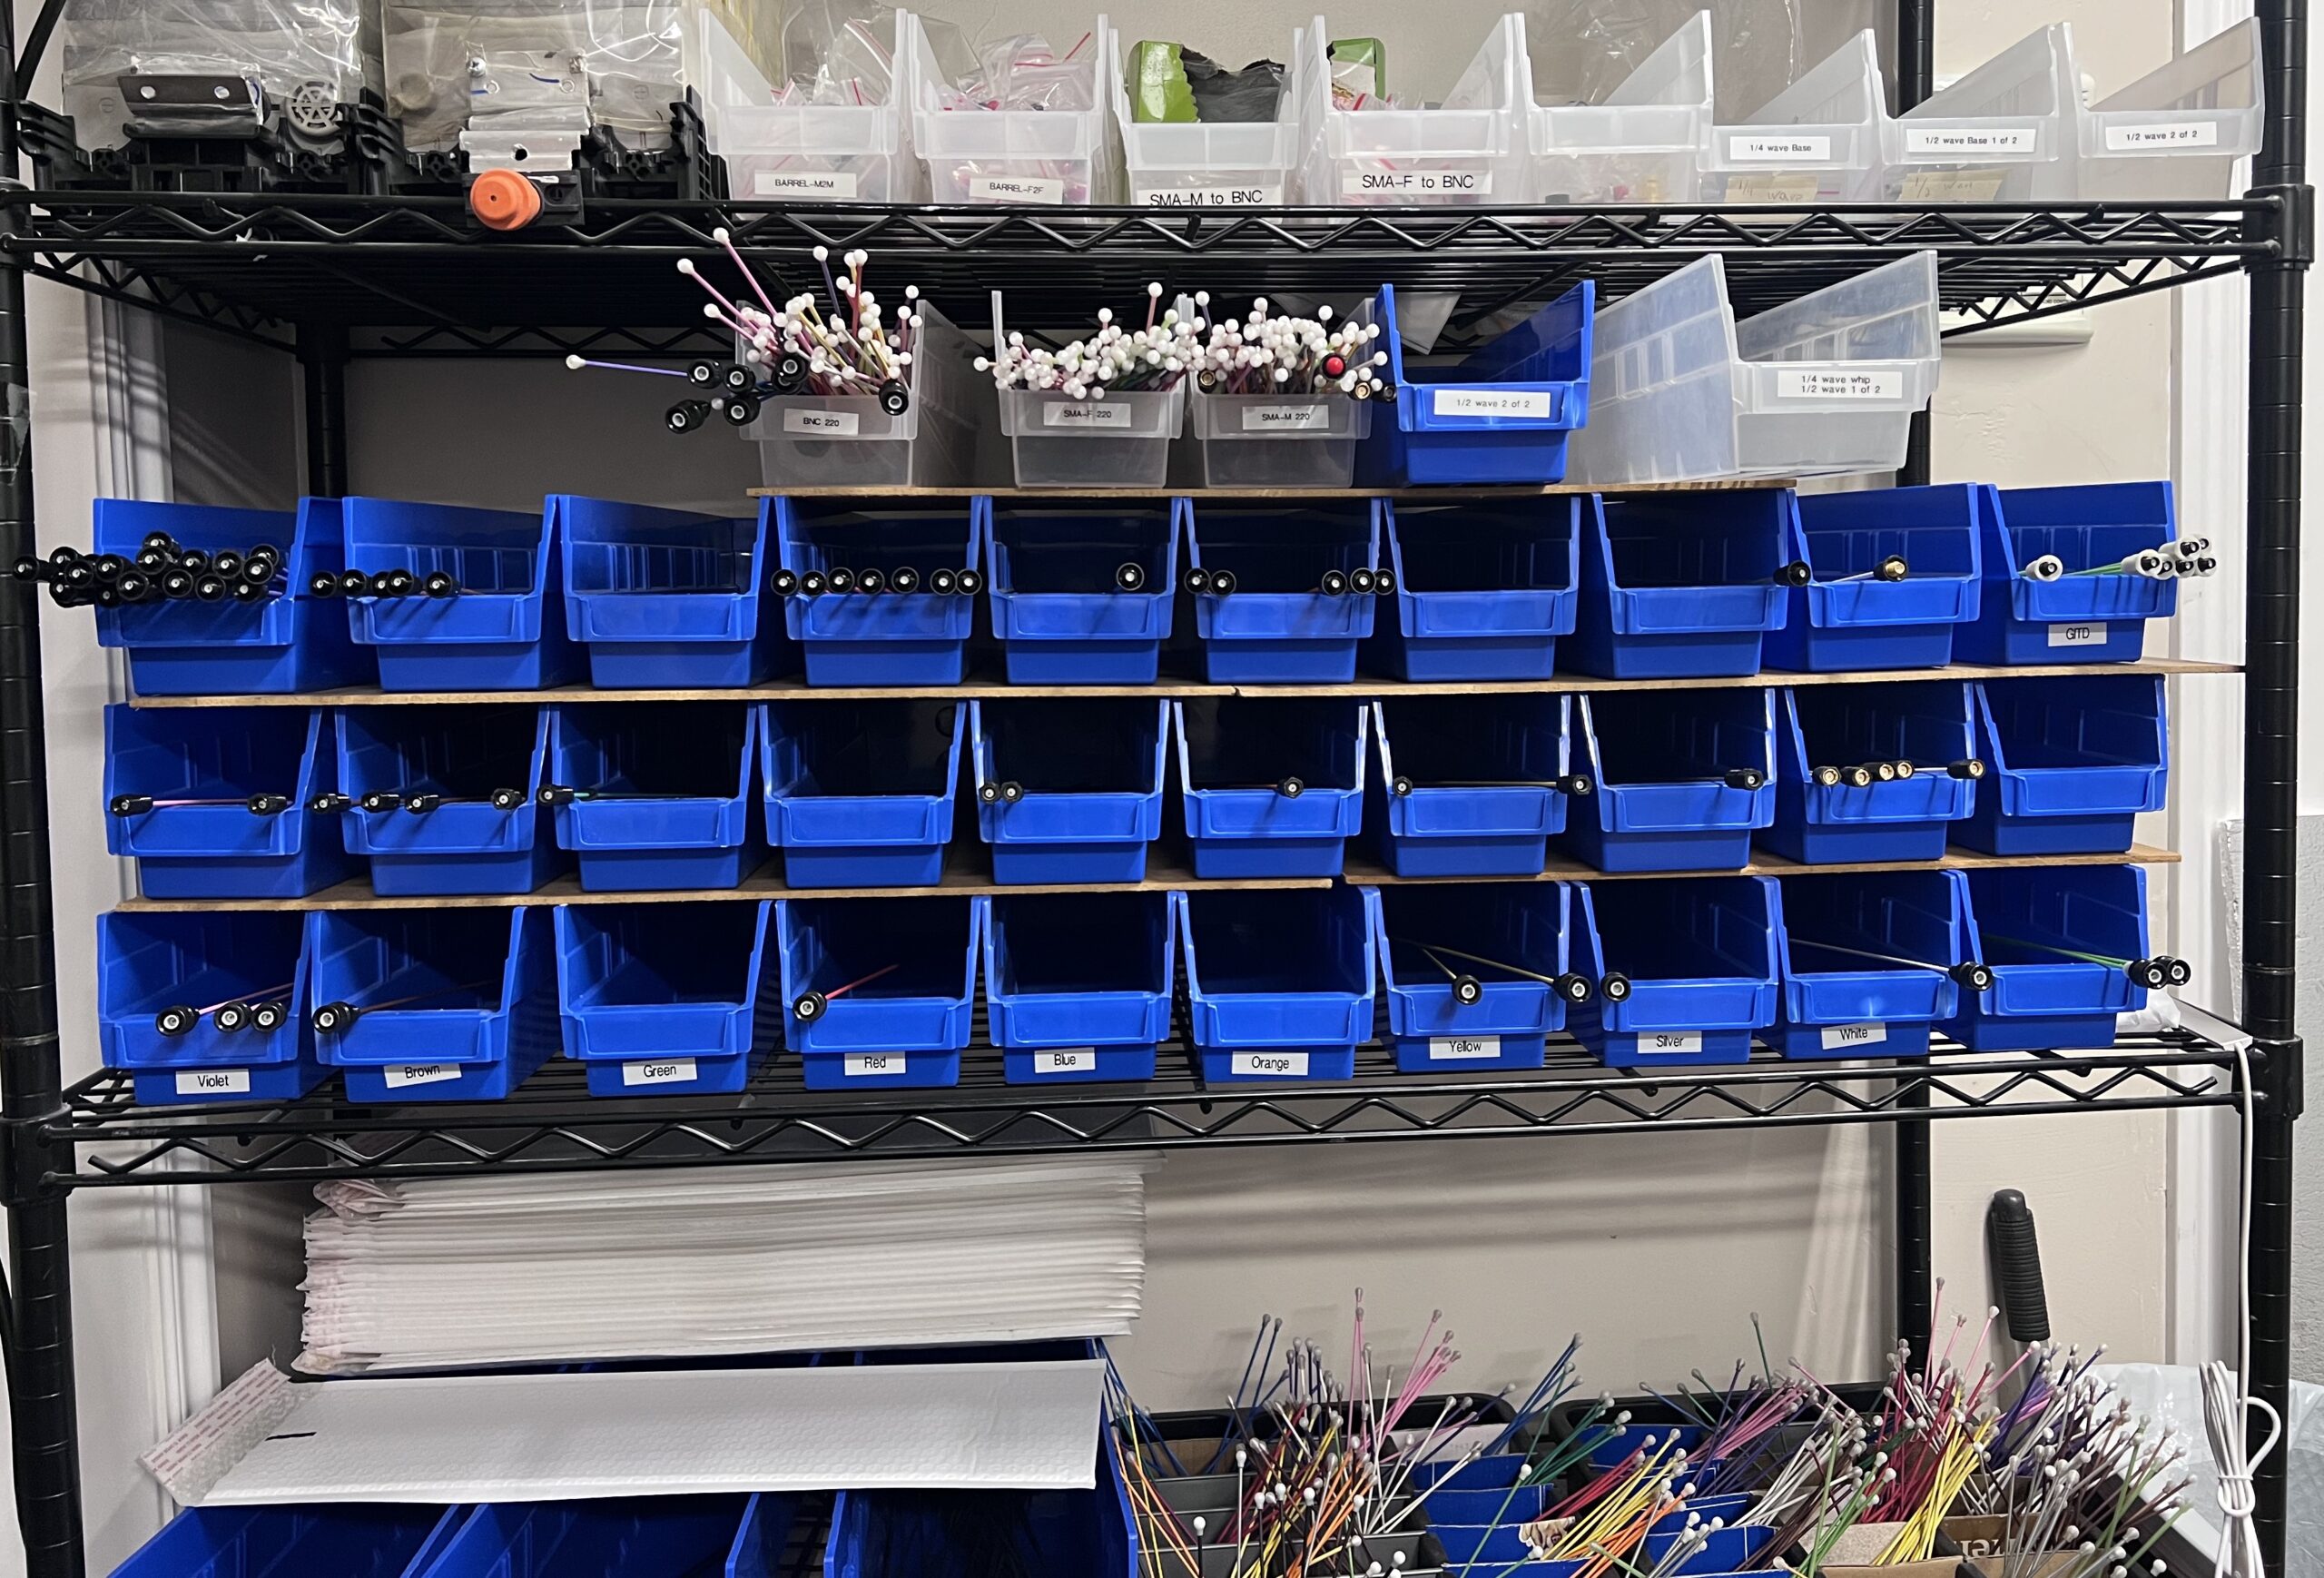
Shipping the antennas
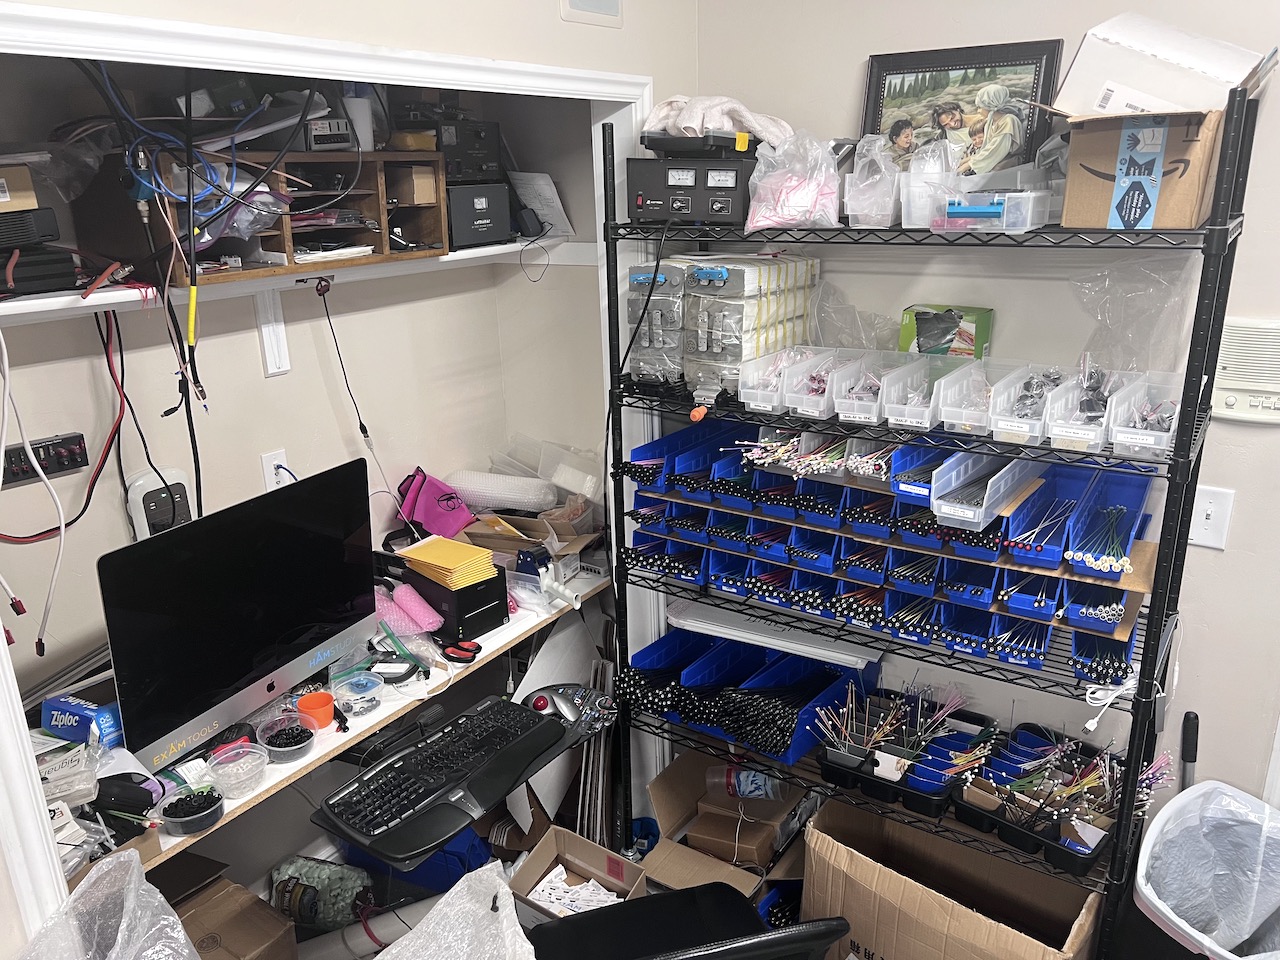
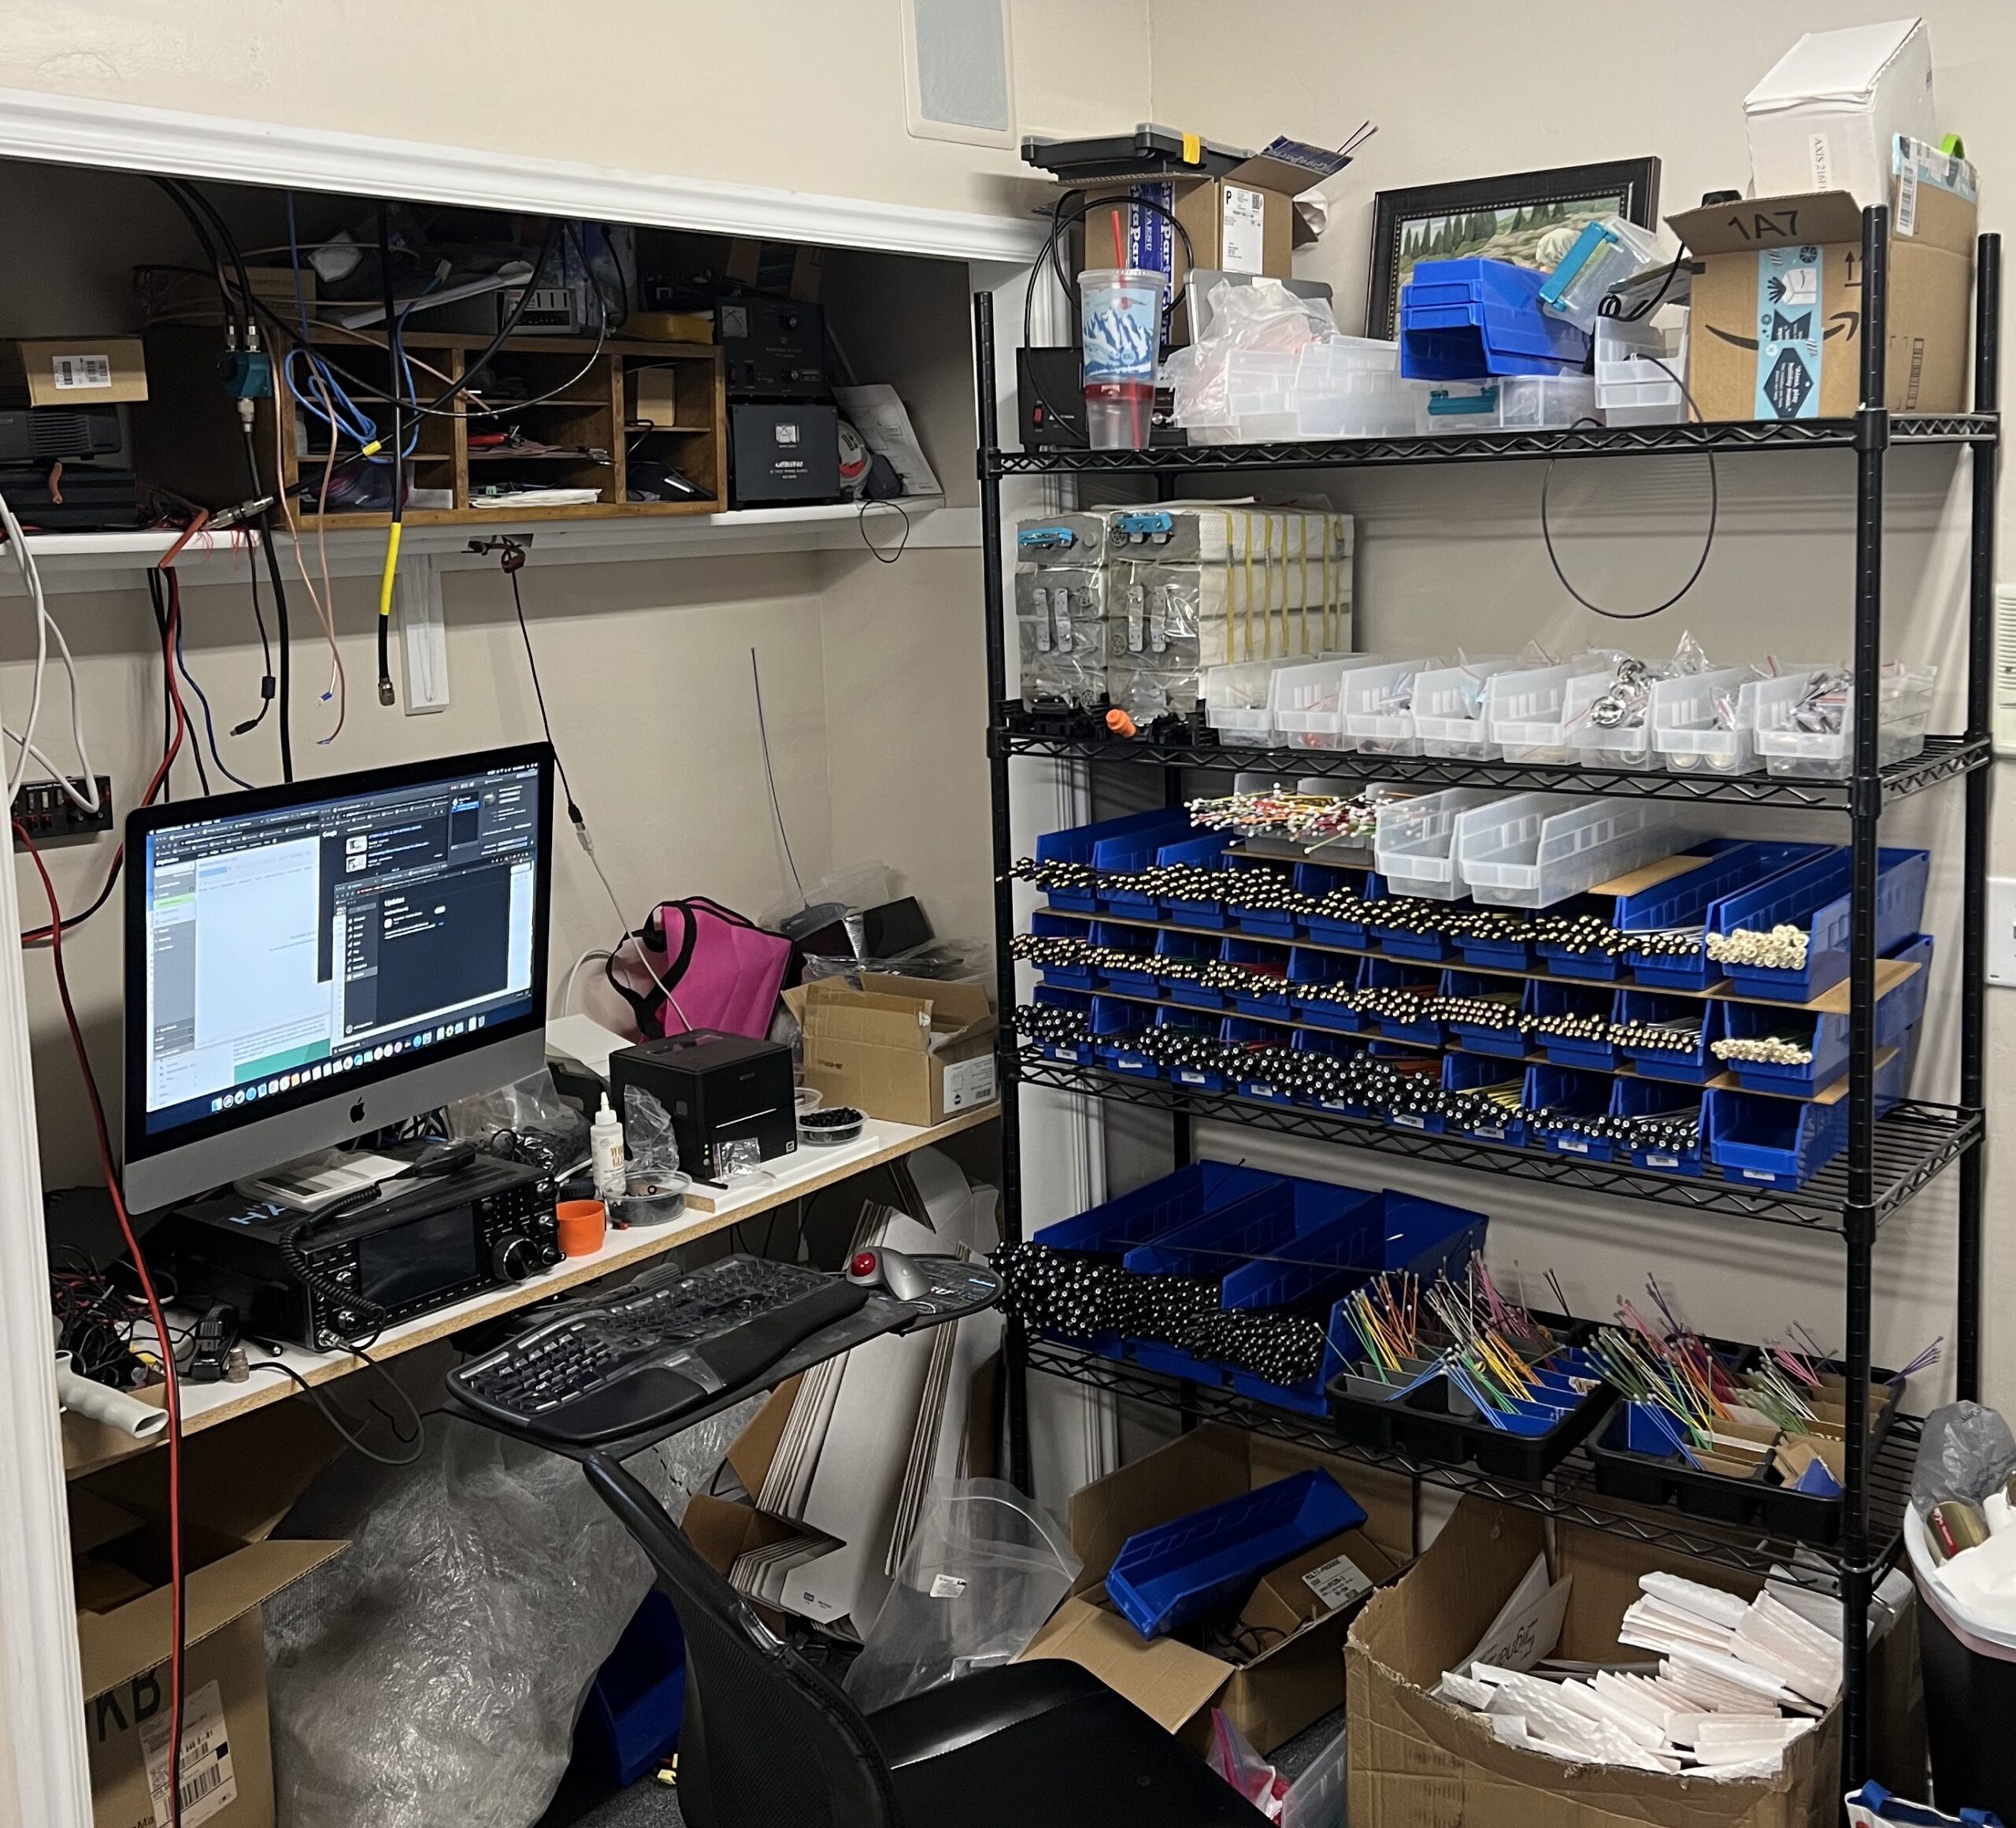
The last bit which may be interesting to you is the shipping. My oldest son Caleb (13yo) has been doing the shipping for me lately when time allows around school, but all of the antennas are stored on racks in my office to make it easy to locate.
Why I do this
With all of this, keep in mind that I am a computer software engineer — I’m not a manufacturing engineer and I’m neither an electrical nor an RF/antenna engineer. I honestly did not set out to build this into a company.
Many years ago I saw a need in the ham radio community for better tools around study and administration of ham radio license exams; I set out to try to help with that. For a lot of years it was something that I did purely in my “spare time” (hah, I have 5 kids… “spare time” indeed….) but in 2020 with remote exams I hit a point where I realized I just couldn’t keep this up without dedicating more time to it. Fortunately, by that point Signal Stuff sales had reached a point where I was able to drop to half time at my “day job” and have since that time worked on HamStudy / ExamTools / Signal Stuff part time as well. I still don’t have as much time for software as I’d like, but I hope that if Signal Stuff keeps growing I will eventually be able to do this full time =]
Thus if you place an order with Signal Stuff and I tell you I appreciate the support — that is not just a formulaic response! It really is all of you who support Signal Stuff that allow me to do the things that I really care about. At the same time, if you wonder why I don’t do things like custom antennas or why I don’t spend more time building new designs — it’s because I’d rather build new features into my software.
So there you have it! Feel free to ask questions in the comments; I’m sure I’ve missed things, but like most things I’ve rambled on longer than I intended, so I’ll leave it there for now!
We have maintained the same price for over 10 years — since long before we opened the web store. Unfortunately, our profit margins have been taking a steady hit:
The 1.5mm nitinol wires cost a bit more than the 1.1mm wires did
We now have connectors custom made in order to improve quality
We’re getting everything in black now so that things look snazzy
Material (particularly metal) prices have been slowly but steadily increasing over time
Due to issues with COVID we haven’t been able to gather as many suckers volunteers from the local ham radio community to help with manufacturing.
Because of the above, I’ve needed to pay another company to build the signal sticks for me, which has a very measurable effect on the margins which actually exceeds the increase we’re making here.
I have been very resistant to increasing prices and have put it off longer than I should — but I’ve had to face facts and admit that it’s past time for a small increase. Our manufacturing costs for the Signal Staff have also increased and so that is getting passed along as well.
Here are the new prices:
Black Signal Sticks: increased from $20 to $22
Glow in the Dark Signal Sticks: increased from $26.50 to $29
Other Signal Stick colors: increased from $23 to $25
Signal Stalk 1/4 wave: increased from $32 to $35
Signal Staff: increased from $60 to $65
All adapters: increased to $5
All bulk discounts remain the same on a percentage basis.
I have already updated the site with the new prices but have put a sale in place to keep things at the previous price for a bit longer but plan to take the sale down in a week (Feb 9, 2022) at which point the new prices will take effect.
As always, thank you all for your continued support! Sales from this site are what allow me to spend so much of my time working on ExamTools and HamStudy, as well as allowing me to support many other endeavors in the ham radio community.
Another year passed and we’re in November already! Several of you have asked already if we are doing a Black Friday sale — as a policy we don’t give out details of any sales before we announce them. This is a good company policy because aside from other considerations it nicely obscures the fact that I usually decide exactly what we’re doing while we are typing up the announcement. Shhh… don’t tell!
This has been a crazy year and the most notable change is that I’ve had to outsource most antenna manufacturing to a local company here in Utah County instead of building them all myself; I hated to do that for a number of reasons, but I just don’t have time to keep up with building antennas and still write software, and since Signal Stuff exists primarily to enable HamStudy and ExamTools that would kinda defeat the purpose!
Here are some interesting things that have happened this year:
Most Signal Sticks were built by a local company instead of by myself (Richard, KD7BBC) and local volunteers
We have switched to black connectors on most Signal Sticks and all adapters
HamStudy now has Spanish translations of the question pools (but the software hasn’t been updated to fully use them yet, sadly. You can still study them if you knowtheURL)
ExamTools, our license exam administration software, was involved in over 30% of the exams administered in the last 12 months! Those exams were easier to administer, more random (no reuse), and generally resulted in people getting their callsigns much more quickly! About 80% of those were remote and the other 20% were in-person.
Signal Stuff hired someone to manage shipping — but sadly life changes on the part of the employee have resulted in shipping returning to my basement.
The Signal Stuff Super-Soporific Shipping Station
Here are some things that are still coming up:
Sometime soon we plan to have a rubber cover on the outside of the BNC connectors which will hide the notches and just generally look nice.
We are working to get Signal Stalk wires which will handle lower temperatures
More ExamTools features are being added all the time, with a new registration process and better team management features being high on the list
I am experimenting with using Machine Learning and Artificial Intelligence to provide more effective ways to analyze the question pools and study effectively — nothing specific to promise yet, but there are a lot of possibilities.
This is all quite a bit for a single person to do — even with all the help various people give me — so I appreciate the support of all of my customers!
The sale
Okay, this is what you’ve really been waiting for. Thanks for letting me ramble! Sadly I can’t discount quite as much as I have in some past years — material prices are increasing and I’m no longer building things myself. In fact, we will almost certainly be increasing prices in early 2022, so this may be the cheapest you’ll find our products from this time forward! That said, I hope you’ll still find it helpful =]
Our sale will start on Friday, Nov 26, 2021 and last through Monday, Nov 29, 2021, with the following discounts:
When we say “all new” we mean “we finally got it in stock and added it to the site halfway through the sale” — it’s that new =]
Introductory price: $20.00$15.00
PLEASE NOTE: Orders placed before the sale starts or after it ends will not get the discounts; if you didn’t read the dates, we’re very sorry but are still happy to sell you items at regular price.
Wow — this has been quite a year! So far this year:
The pandemic led to the need for fully remote exams, which mostly use our ExamTools system
SignalStuff owner Richard, KD7BBC, changed to half time at his day job (this has always been a side project, did you know?) so he could spend more time on HamStudy and ExamTools development — all funded by sales from this site!
We partnered with S&K Antennas to bring you the Signal Staff
We introduced graduated volume discount pricing for Signal Sticks
We introduced colored Signal Sticks — including a fully Glow In the Dark signal stick, because you know you want one ;-)
And most recently (in the last few weeks) we finally have a vehicle mount super-elastic antenna, the Signal Stalk!
So, it seems like a good time to celebrate =] And so we introduce to you the 2020 Black Friday Sale:
Starting on November 27 until the end of November 30, all Super-Elastic Signal Stick antennas, Super-Elastic Signal Stalk antennas, and all adapters will be 20% off regular price! Unfortunately the Signal Staff OSJ costs too much to make for us to do that, but we’ll still be marking it down 10%.
Did we mention that the HamStudy app will be on sale for 25% off? $3.99 $2.99
This is the only sale we do, so get ’em while they’re hot!
Disclaimer: due to a persistent desire not to see our children destitute and living in the gutter, these sale prices *will not* combine with the regular volume discount pricing.
This sale will start on Nov 29, 2019 at 12:00 am MST and run through midnight on Dec 2, 2019.
We have for you this year:
Semi-elastic signal sticks: $12.00 $9.50 each! (20.8333% off!)
For those not familiar with these, they don’t return straight as easily after coiling; they are the result of a batch of bad wire that we’re offering at reduced price with no warranty due to popular demand.
Select “semi-elastic” on the Product Page to order
Super-Elastic Signal Stick: $20.00 $16.00 each! (20.0000% off)
Select “super-elastic” on the Product Page to order
All percentages have been rounded to 4 decimal places for your bargain-hunting convenience!
Also note that the HamStudy.org mobile app will be on sale for $1.99 (50% off) for the same duration! All sales at signalstuff.com support hamstudy.org development and related projects.
From Friday, Nov 23 through Monday, Nov 26, 2018, Signal Stuff will be running a Black Friday sale with all antennas 25% off!
For those of you who have participated in previous years sales, you may not know that these are different (better!) antennas than we have sold in previous years; the wire thickness on our dual band model has been increased by 36% but the flexibility remains! Buy one today! (or, well, during the sale, we suppose)
You know you want one. All the cool hams have one.
All antenna sales support development and advertising of HamStudy.org and related products. Order one here.
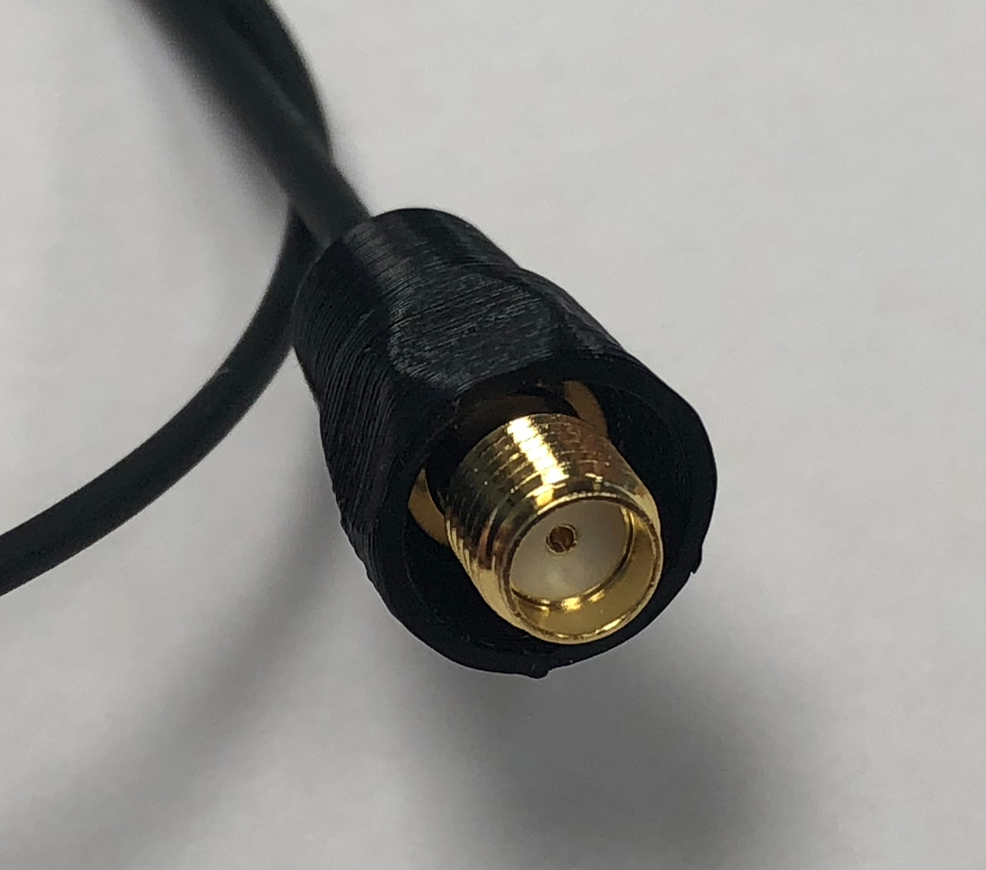
It’s interesting how sometimes small side effects can add up over time to be a real problem. Recently I’ve had a couple of concerning support requests which led me to start taking some measurements, and I discovered something concerning: our SMA-F connector covers have been gradually changing over time, slowly enough that I had not noticed until it started being an issue for a few customers.
Keep in mind, this is not a problem which affects most customers — users of most Baofeng radios would not likely see an issue — but it revealed a flaw in our design and process which was just a little concerning.
The old glue cap
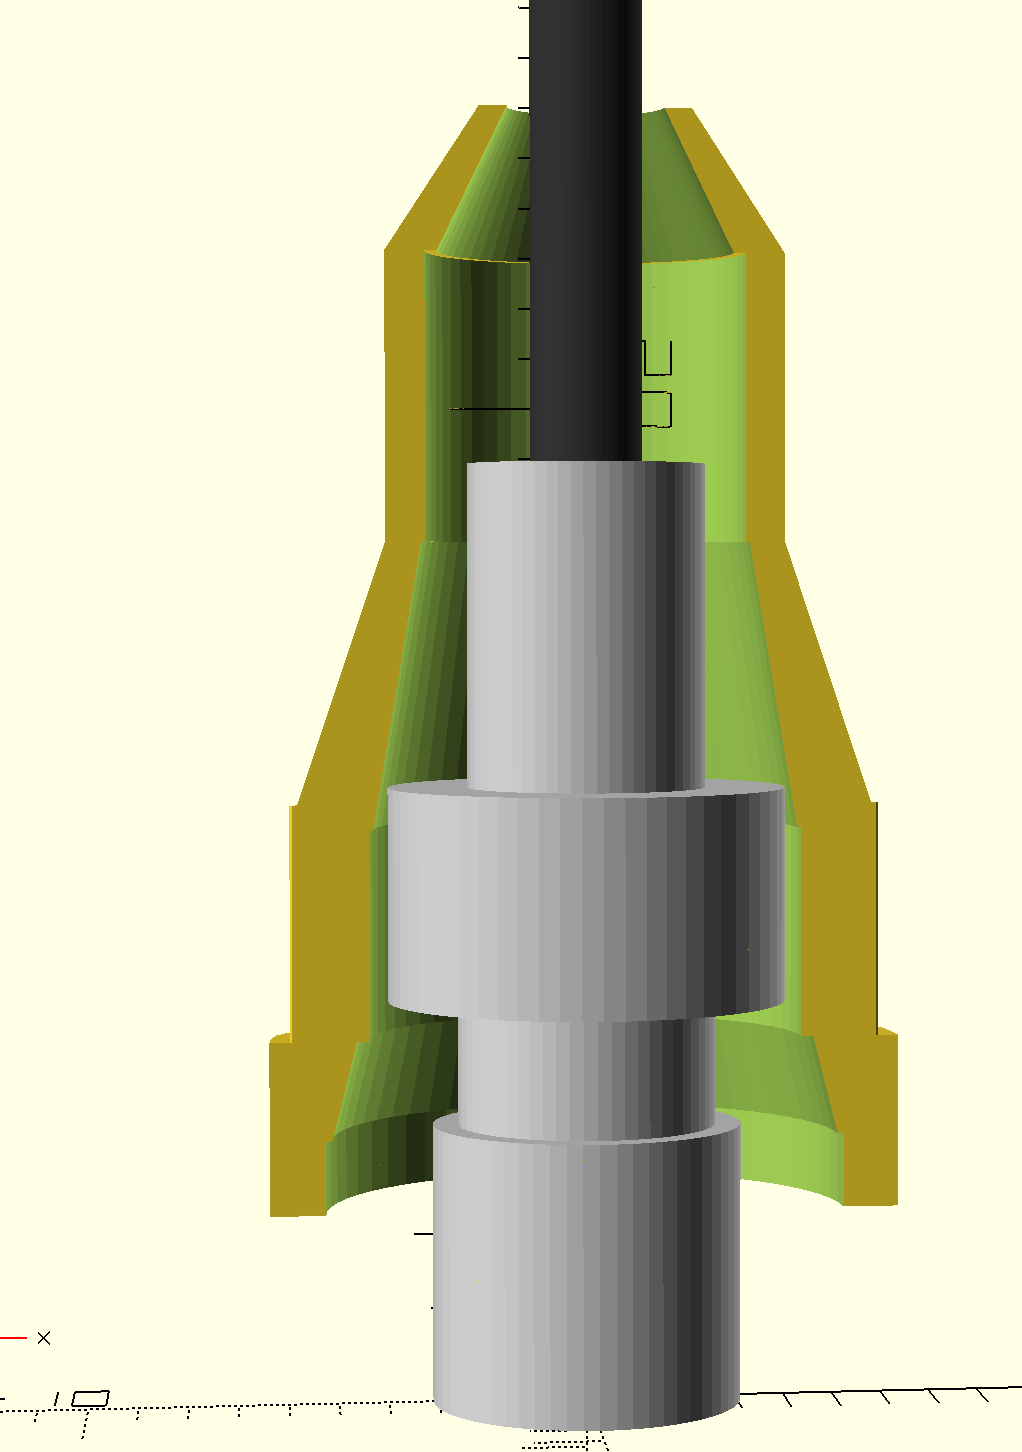
We refer to those plastic covers as “glue caps” — though it’s true that they make our antennas look a lot nicer, the design is actually intended to hold the adhesive (glue) where it will do the most good. I’ve gotten a lot better over time at designing 3d models, but it’s been awhile since I really looked at our glue caps. One thing that did not previous occur to me (when I first was learning to design 3d-printable models and made the glue caps we use today) was that with the modeling tool I use (openscad) it’s very possible to design while using a cross section view, allowing me to see a dimensionally accurate approximation of the connector inside the gluecap as I work.
Looking at the old cap, it’s easy to see where the problem came from:
As you can see, it’s the tapered portion that is intended to prevent the connector from going too deeply into the glue cap. Changes over time have primarily focussed on better holding the glue in the glue cavity at the top… unfortunately, that’s resulted in less resistance to putting the connector in too far and less protection against the connector getting crooked.
It’s important to note that the antennas should still work, but they did result in some cases with insufficient threads coming out the bottom. Note that if you have an antenna where this is an actual problem, please RMA the antenna and we’ll get you the new module. 99% of you will not have an issue even with the “flawed” version of the caps.
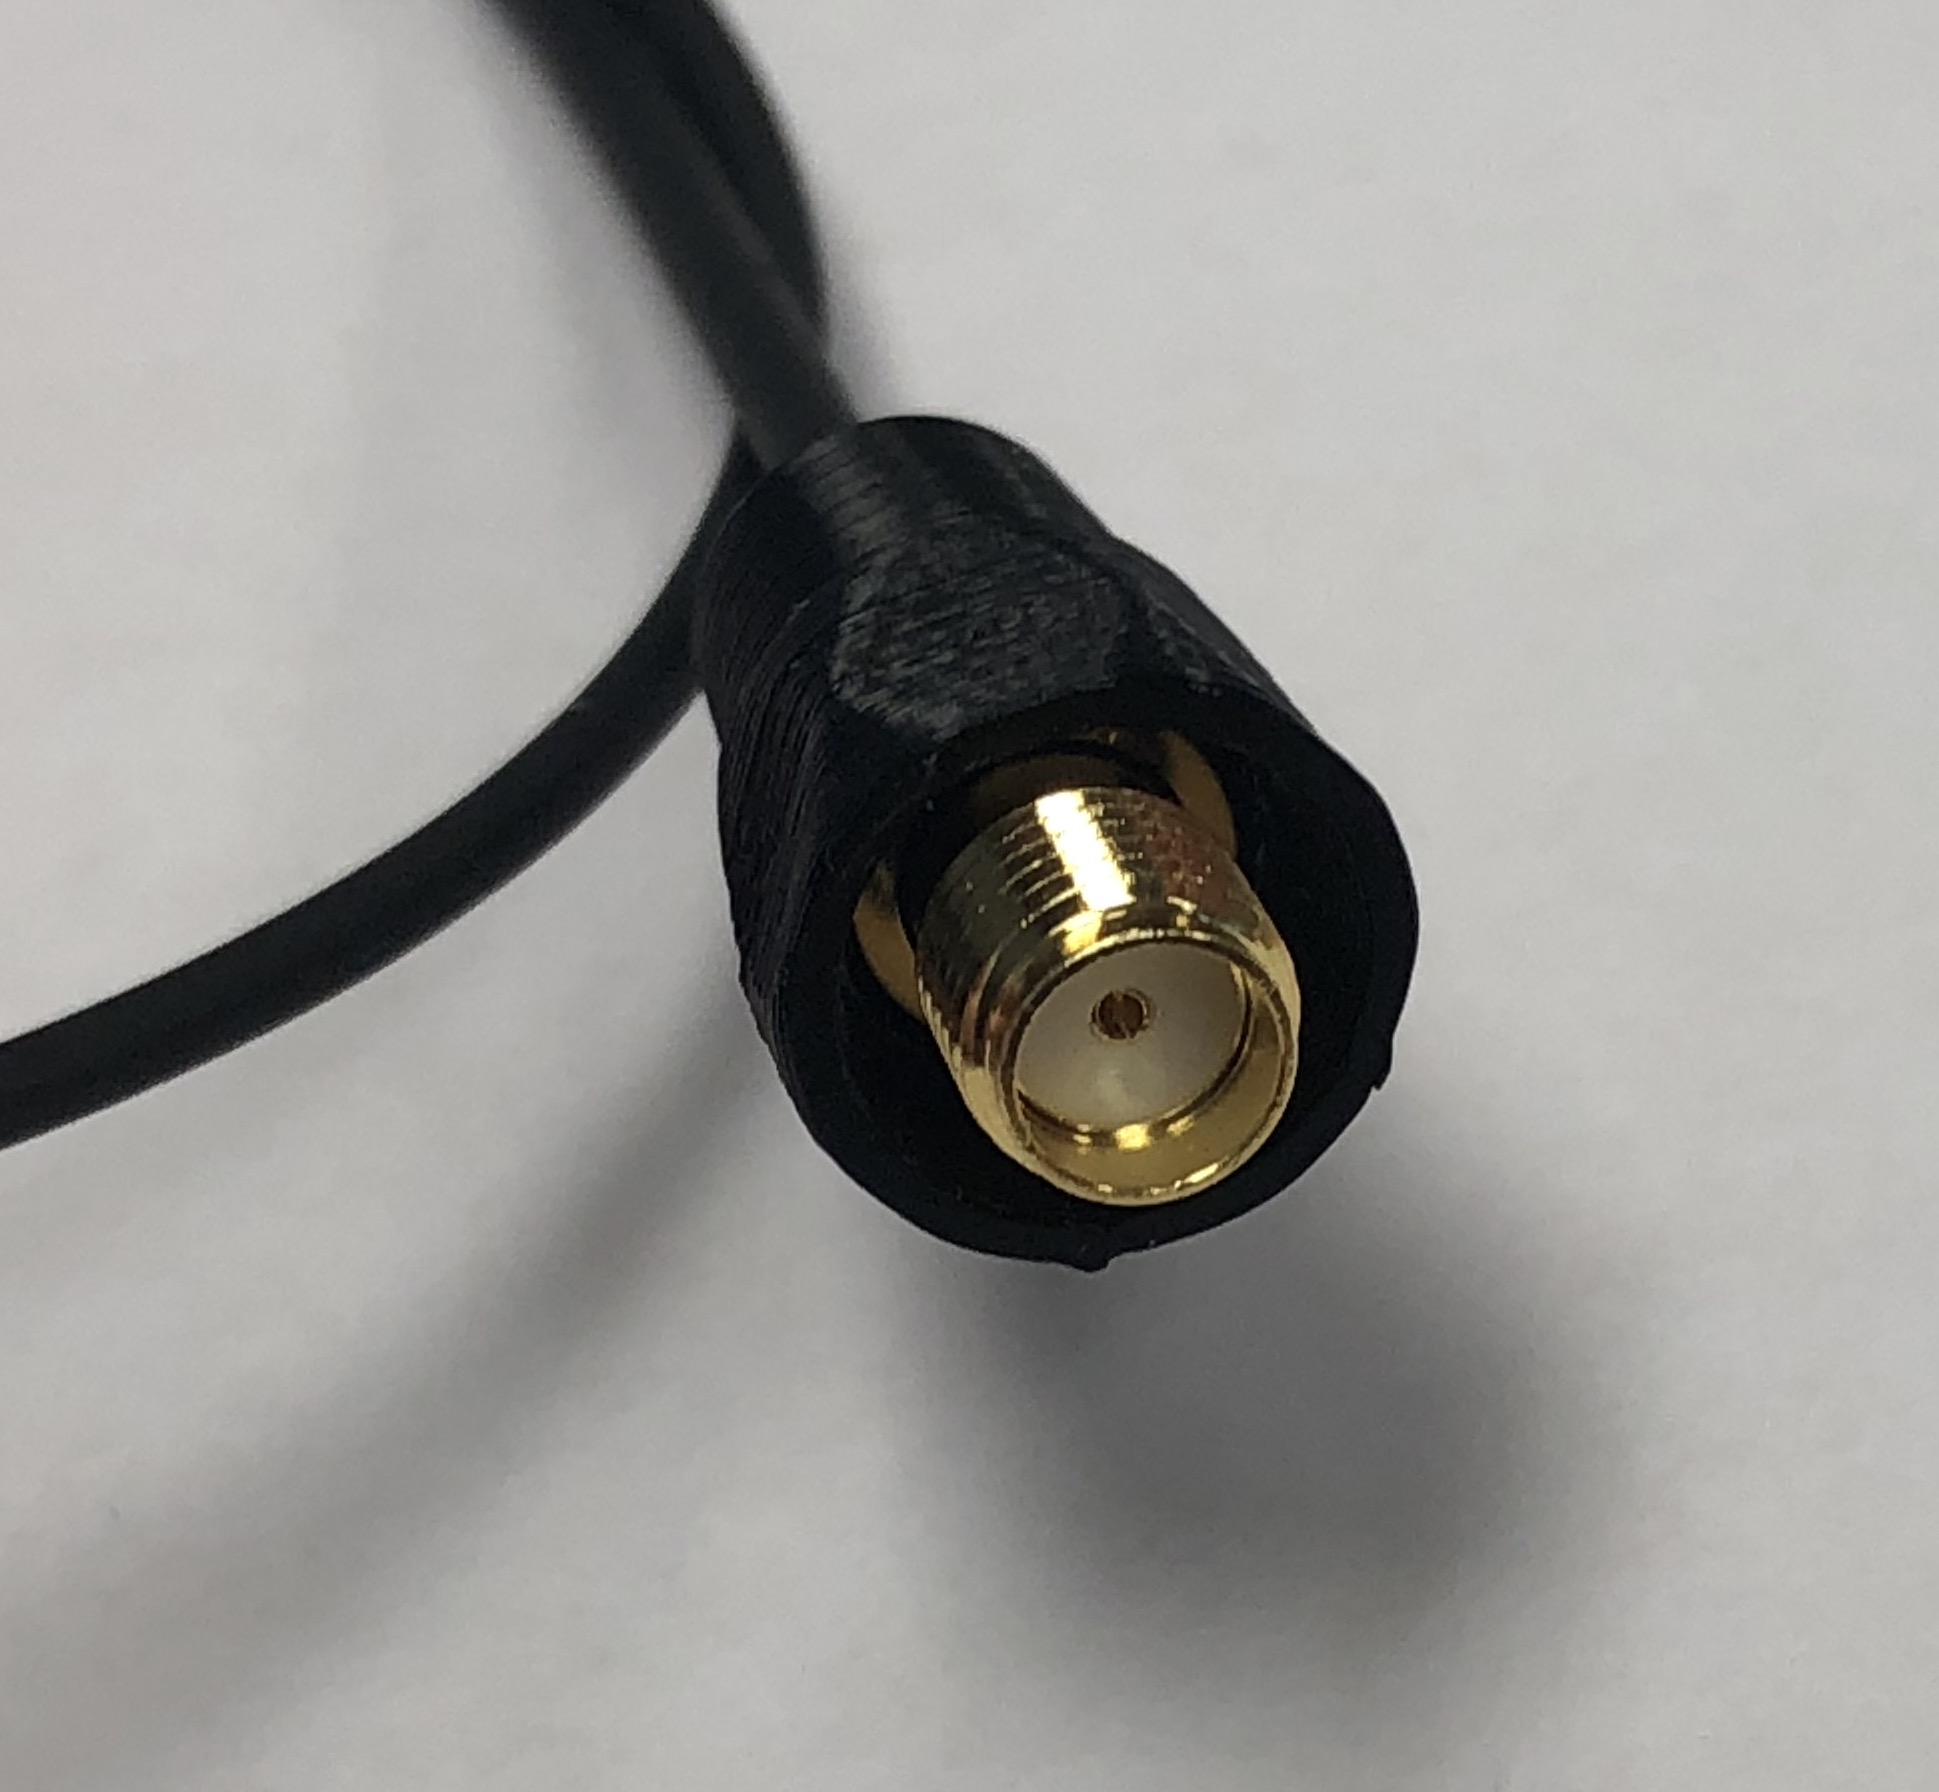
The new glue cap
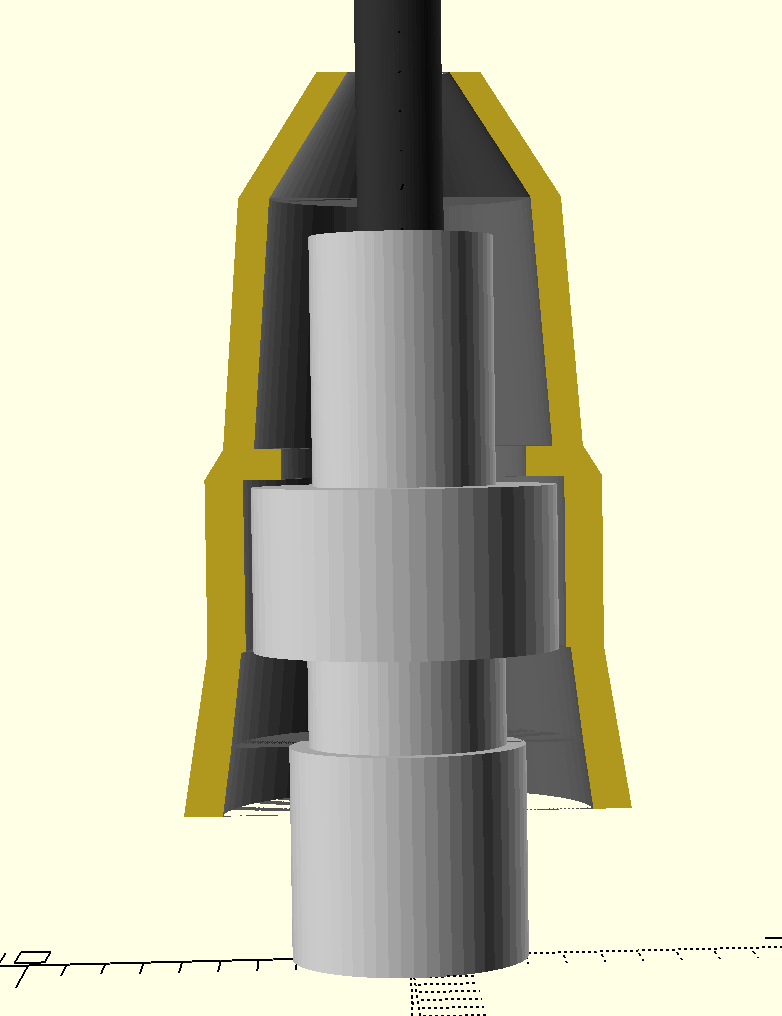
I redesigned the new glue cap from scratch: I remeasured the connectors with high resolution calipers, built it from the ground up using a cross section mockup, and integrated a “connector stop” which should prevent the connector from going in too far as well as do a much better job of keeping the connector straight.
It’s interesting to note that I discovered that the connector caps can actually be smaller while still actually being stronger; this is because the primary strength of the connector comes from the high quality adhesive we use during the manufacturing process which the new cap does a much better job of holding in the critical places.
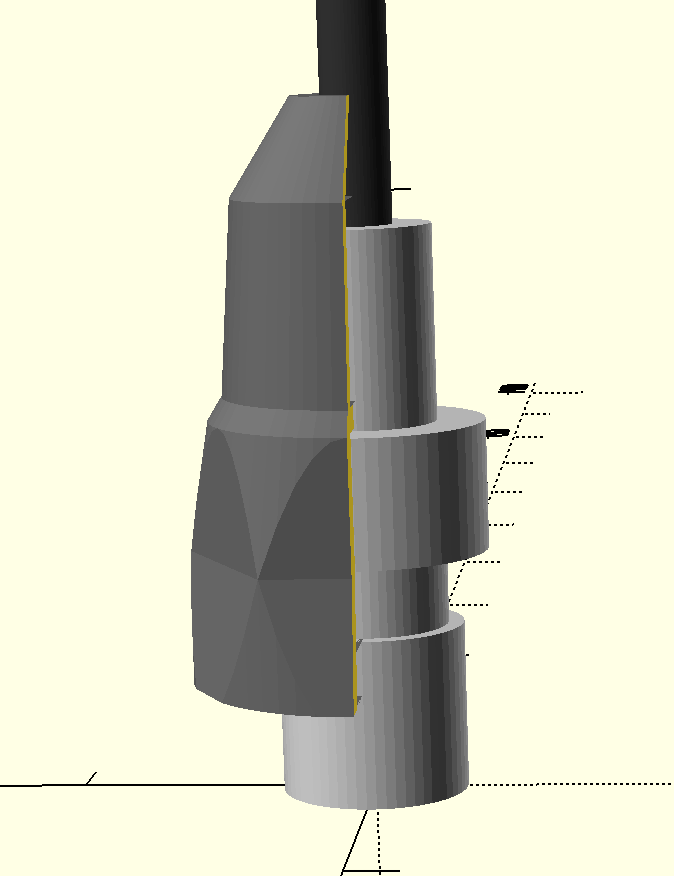
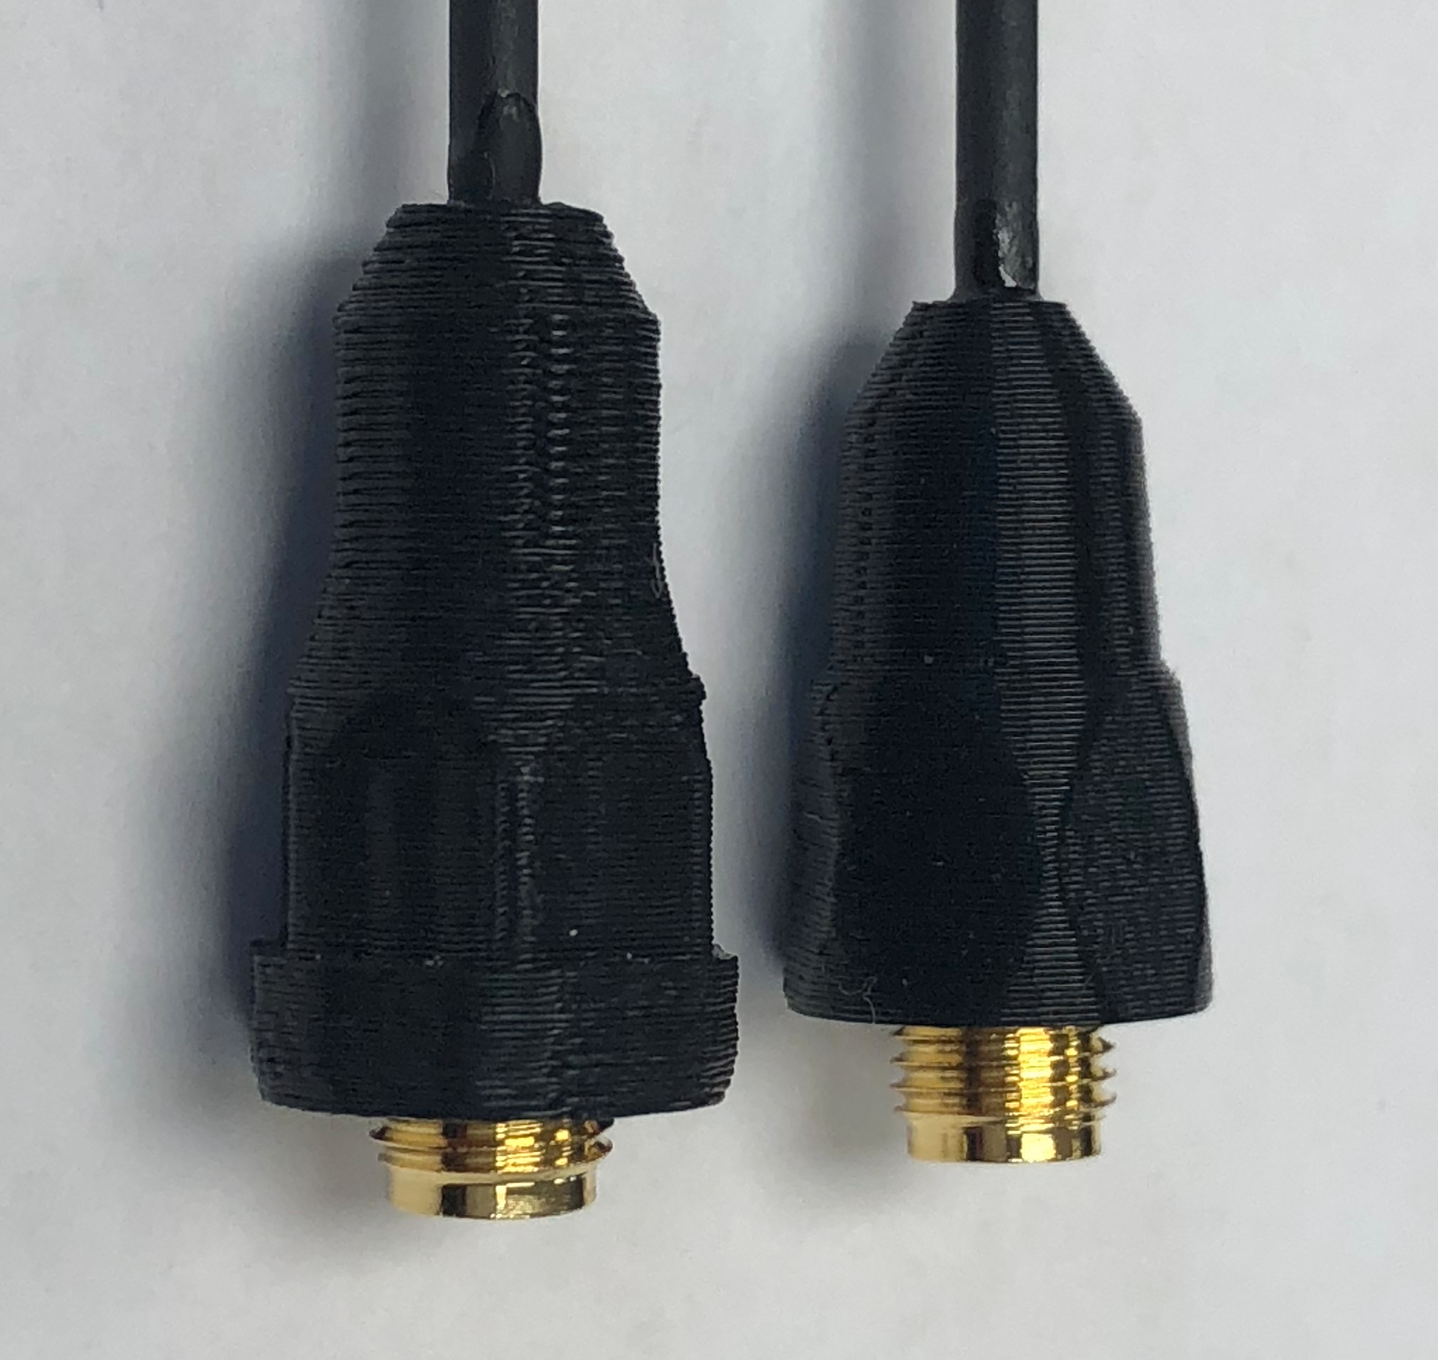
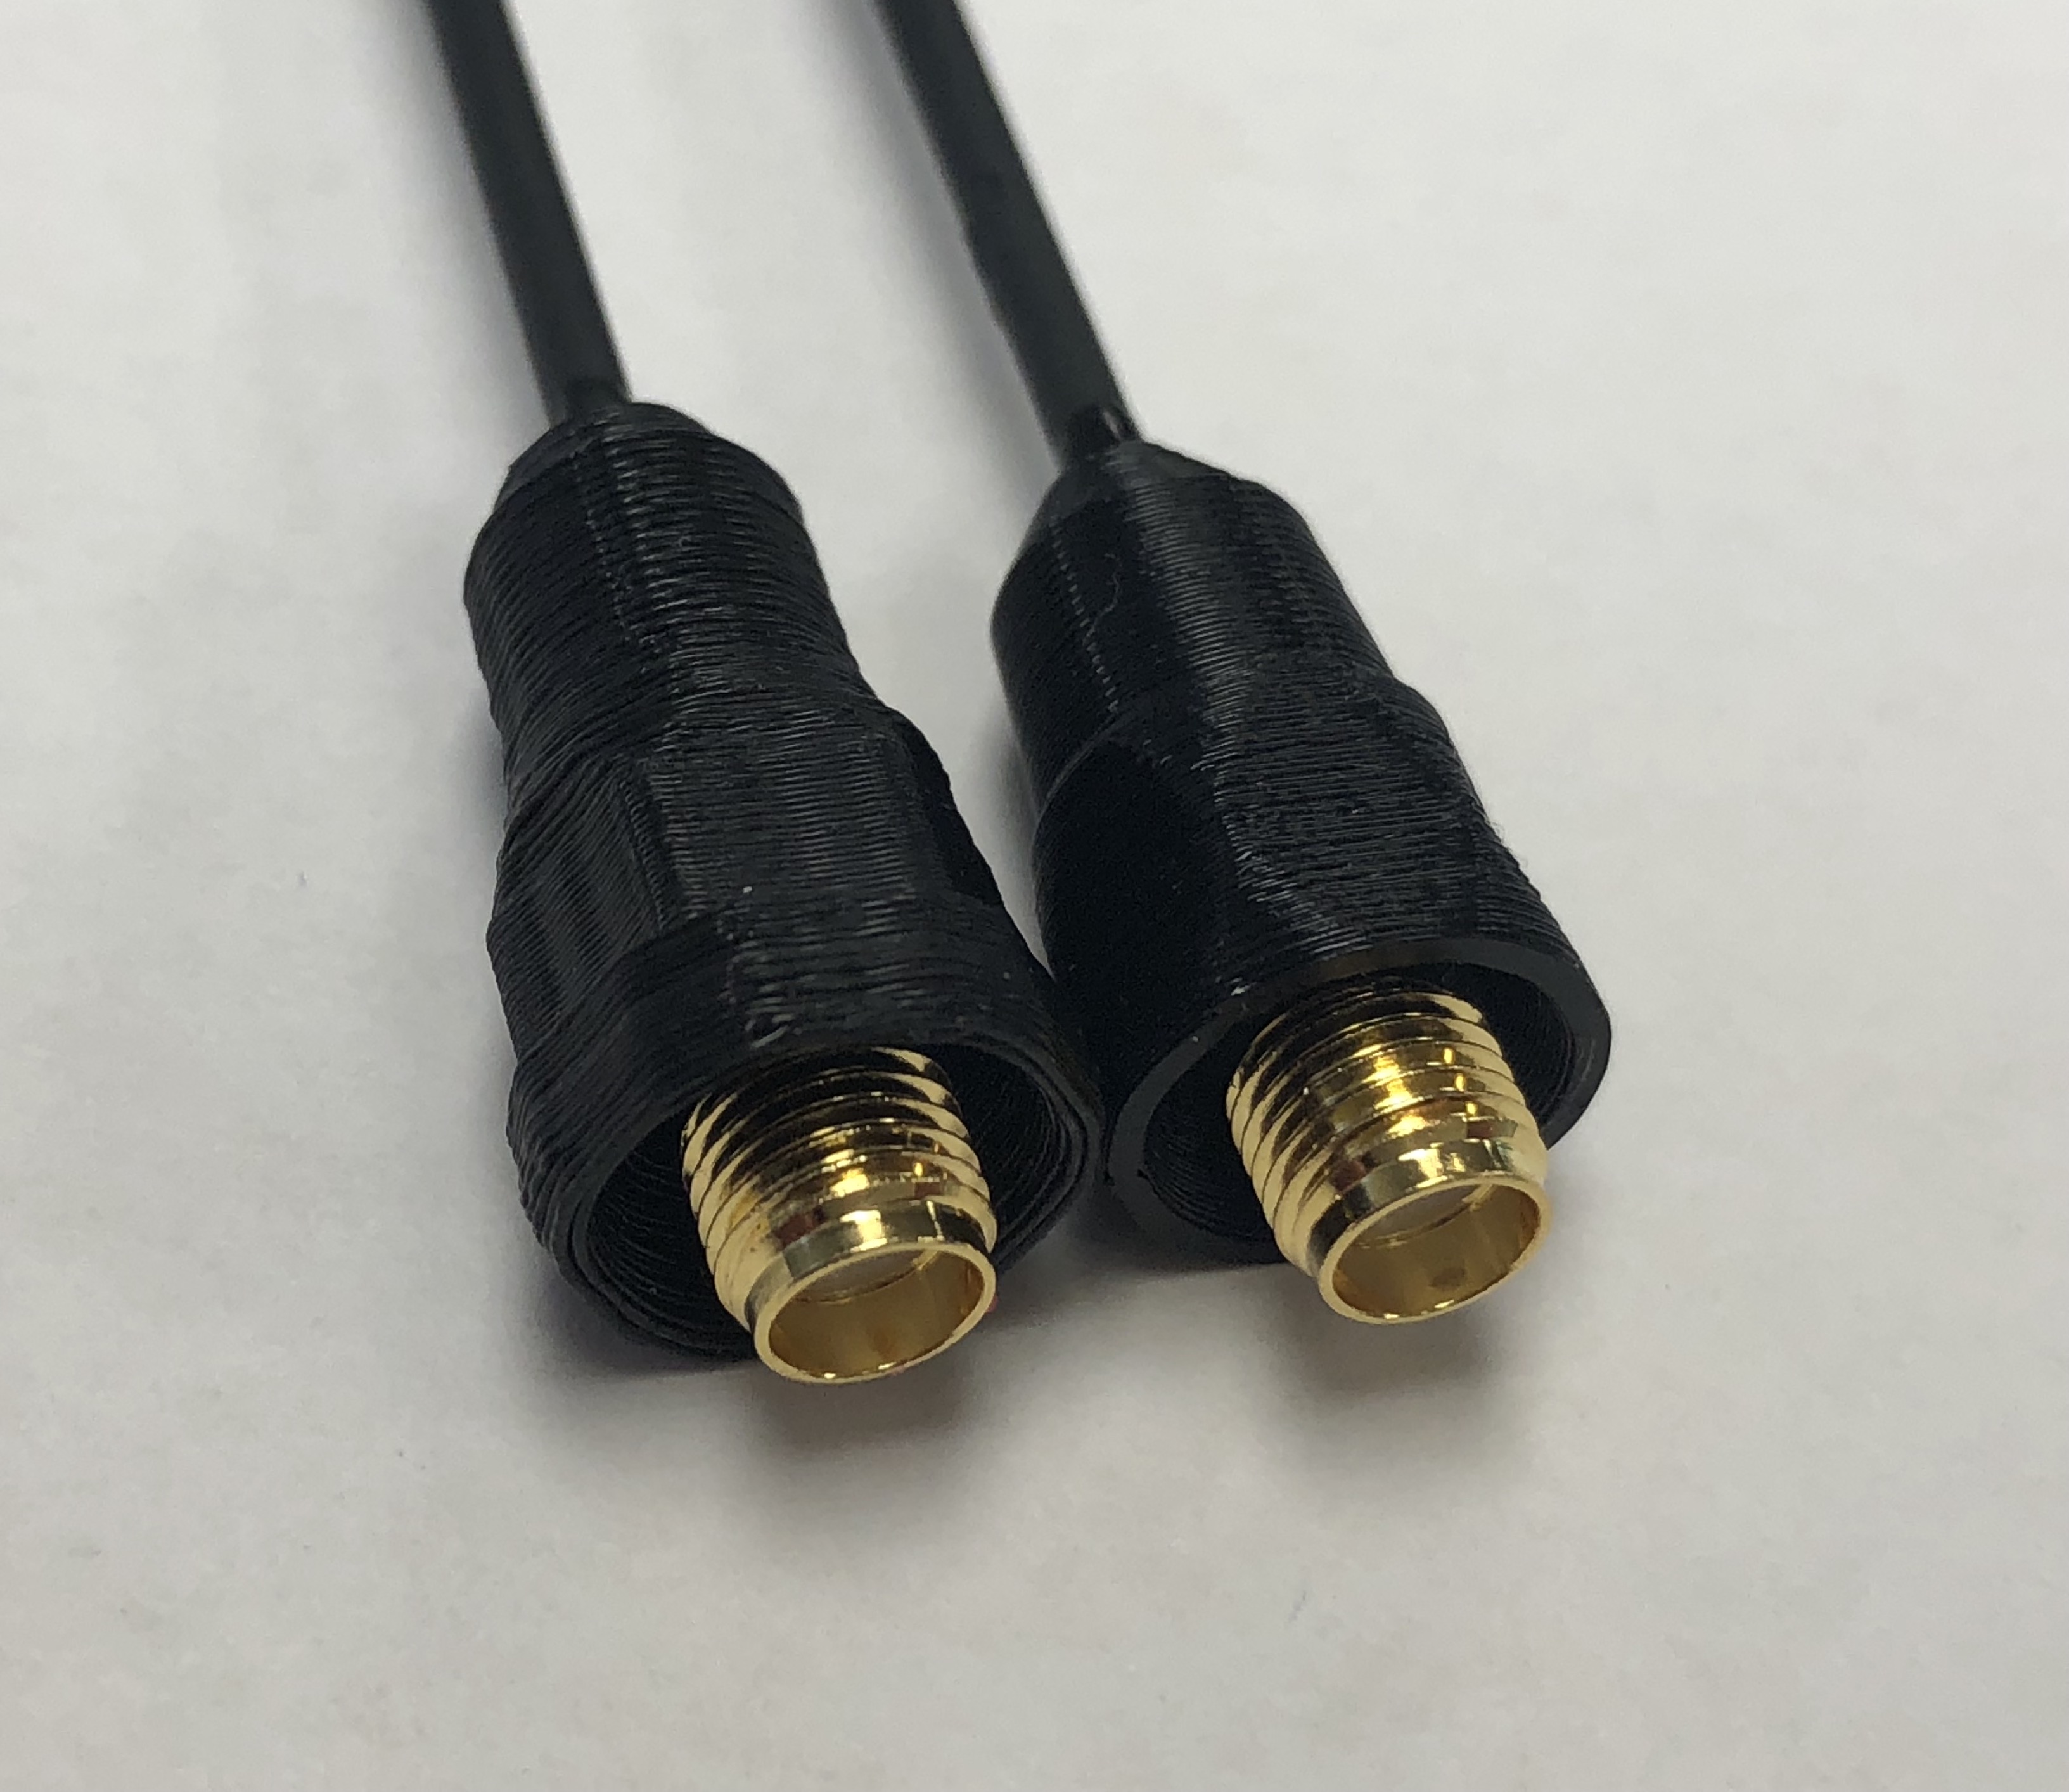
Side by side comparisons
For those interested, here is a side by side comparison of the finished result:

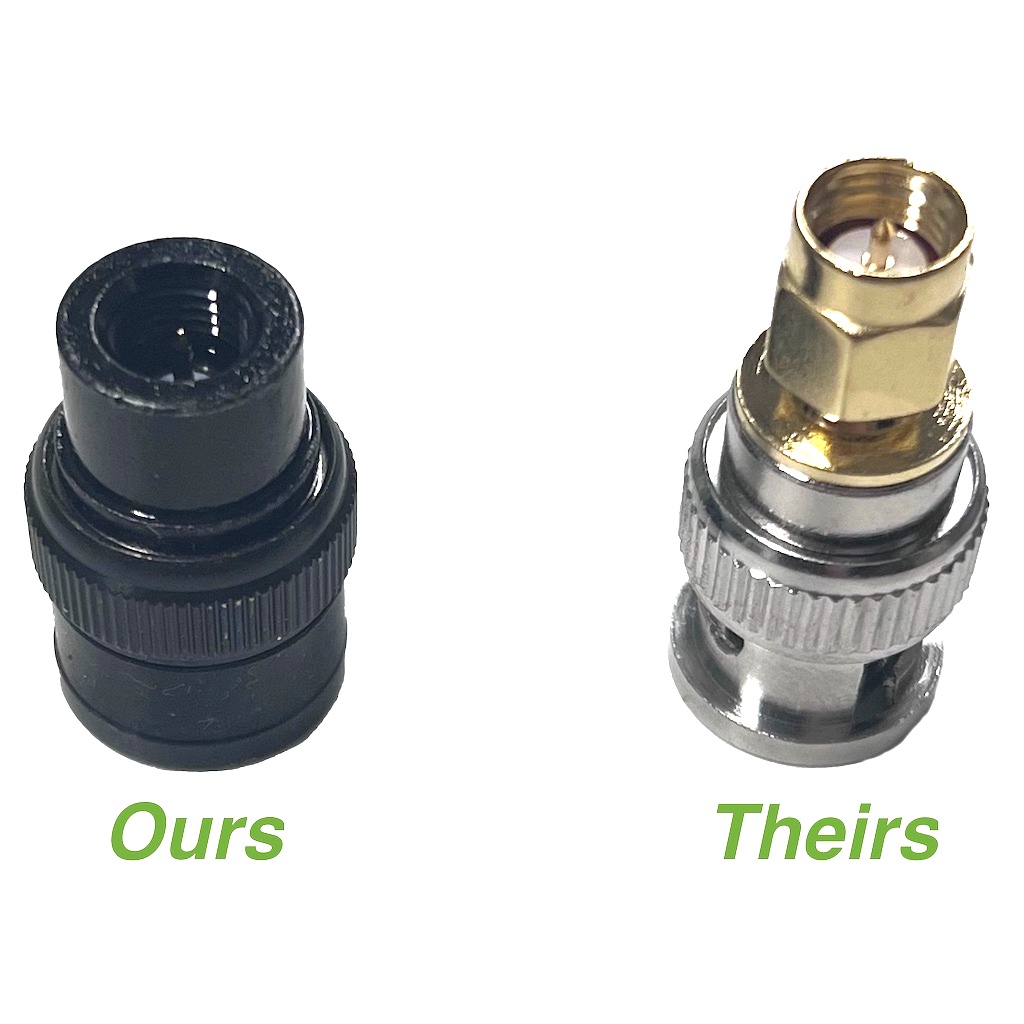


